
Microsoft’s client security solutions are excellent because they deploy seamlessly across platforms and operating systems (OSs). But in the case of Microsoft Defender for Endpoint anti-malware protection running on Linux computers, there are some additional steps to be completed to enable real-time protection.
Real-time protection must be expressly enabled for Linux computers
After installing Microsoft Defender for Endpoint for Linux (MDE.Linux) via any of the supported methods, you might assume that the Linux computer has some automatic protection from infection in place. In fact, a default installation of MDE.Linux results in “passive mode” operations that are essentially “alert only”.
Beginning in July 2023, with release 101.23062 to MDE.Linux, the default enforcement level was changed from “real_time” to “passive”. Figure 1 below explains passive vs. real-time protection.
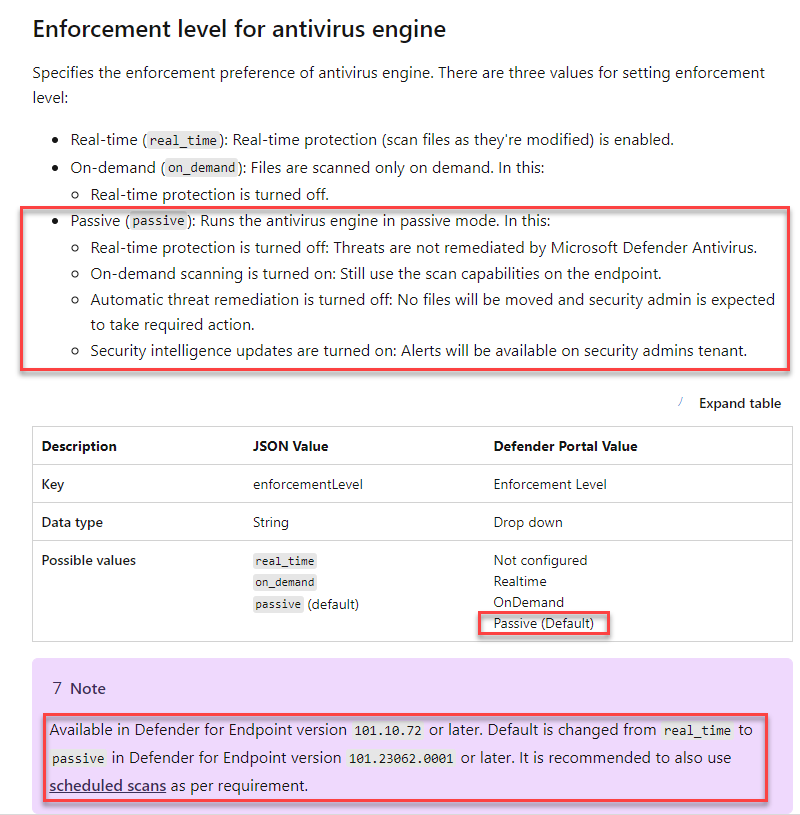
Figure 1 – Enforcement level for Microsoft Defender for Endpoint antivirus engine on Linux computers.
Sometimes, you want MDE.Linux to play a secondary role to another, third-party primary anti-malware platform that will perform real-time remediations. Or you may want to deploy MDE.Linux initially in ‘passive mode’ to production systems in a pilot project before enabling real-time scanning with automation remediation.
But outside these specific scenarios, and a few others, you will probably want your Linux computers to respond to the presence of malware much like Windows systems do. Active anti-malware mitigations like blocking and quarantining hostile files are a high-value feature in most environments.
Options for installing MDE.Linux
The most basic method to install MDE on a Linux computer is to download and run the manual onboarding package from the Microsoft Defender XDR portal (MicrosoftDefenderATPOnboardingLinuxServer.py), but this is not the most scalable or recommended method in most circumstances. For enterprise scenarios, a provisioning engine such as Puppet, Ansible, Chef, or Saltstack is often indicated for getting MDE on Linux client computers.
Defender for Cloud automatic endpoint protection
As far as getting MDE on Linux server computers, a best practice recommendation is to use Defender for Cloud workload protection for servers. Using the newest, most streamlined deployment model for Defender for Endpoint on servers, all that is necessary is to turn on endpoint protection in the Defender for Cloud plan for Servers as seen in Figure 2. Servers in Azure and Azure Arc-enabled servers will pick up this setting via their connection to the Azure control plane.
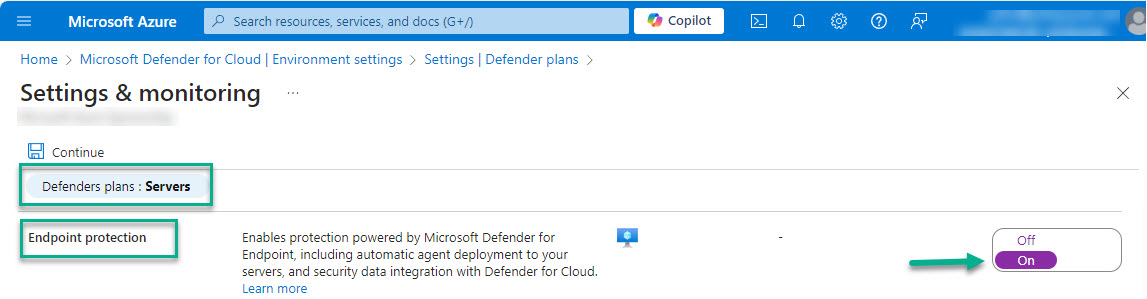
Figure 2 – Enable Microsoft Defender for Cloud, Cloud Workload Protection CWP) for Servers.
Deploy Defender for Endpoint using Azure Policy
Alternatively, or in addition to turning Endpoint protection on in Defender for Cloud, Azure Policy can be used to install and/or validate the installation of MDE.Windows and MDE.Linux on their respective computer hosts. Figure 3 shows the Azure policy initiative “Deploy Microsoft Defender for Endpoint Agent” compliance view when assigned to a subscription or resource group. Two (2) of the four (4) policies contained in this initiative pertain to Linux computers.
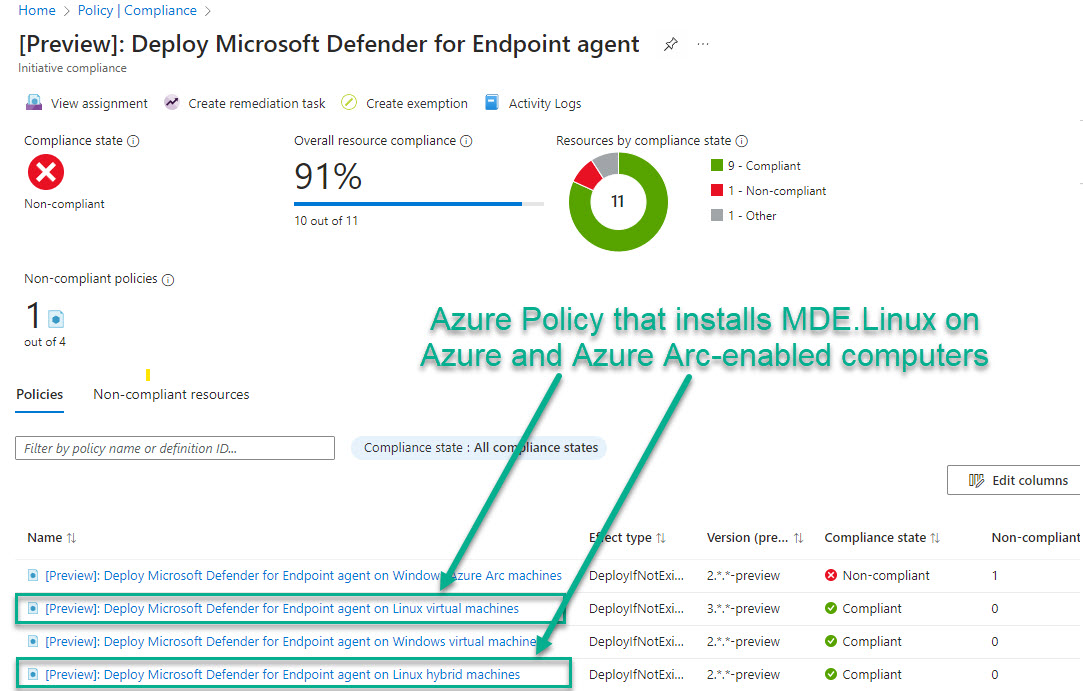
Figure 3 – A single Azure policy initiative assigned to your subscription validates compliance with Defender for Endpoint deployment objectives.
Using either the Defender for Cloud or the Azure Policy method, success at onboarding Linux servers to Defender for Endpoint is realized by the presence of the “MDE.Linux” extension in the Extensions list of the Azure or Azure Arc-enabled Linux computer as seen in Figure 4.
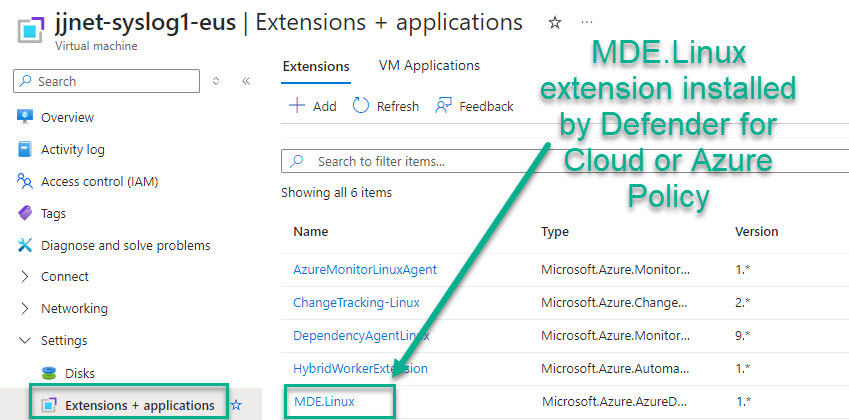
Figure 4 – MDE.Linux installation confirmed on the Azure portal page of the Linux Azure VM or Azure Arc-enabled Linux server.
Configuring MDE.Linux after installation
After onboarding your Linux server to Defender for Endpoint via any method, you should be able to observe the MDE.Linux status on the device page in the Defender console. The Device health status will initially show Defender Antivirus mode is Passive as seen in Figure 5.

Figure 5 – MDE.Linux initially in Passive Defender Antivirus mode until configured with a policy.
To enable real-time protection with automatic malware remediation, you will need to deploy a MDE.Linux policy using a manual configuration file or automatically using an Endpoint Security Policy. Use of Endpoint Security Policies over manual configuration files is indicated (when otherwise supported) for MDE.Linux configuration at scale.
Manually configure MDE.Linux policy using a configuration file
Microsoft has provided guidance on creating a recommended configuration file which can be placed in the file system of a MDE.Linux-enabled computer to turn on real-time protection, seen in Figure 6.
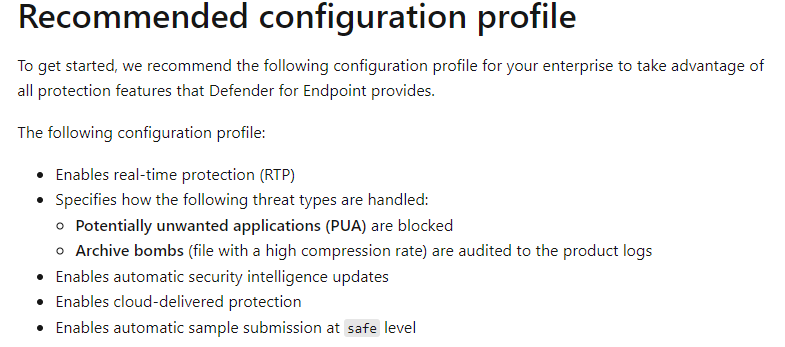
Figure 6 – Microsoft recommendations for creating a manually-configured MDE.Linux profile with real-time protection enabled.
Here is the JSON file content you can save as mdatp_managed.json:
{
   "antivirusEngine":{
      "enforcementLevel":"real_time",
      "behaviorMonitoring":"enabled",
      "threatTypeSettings":[
         {
            "key":"potentially_unwanted_application",
            "value":"block"
         },
         {
            "key":"archive_bomb",
            "value":"audit"
         }
      ]
   },
   "cloudService":{
      "automaticDefinitionUpdateEnabled":true,
      "automaticSampleSubmissionConsent":"safe",
      "enabled":true
   }
}
Deploy the JSON file content to /etc/opt/microsoft/mdatp/managed/mdatp_managed.json as seen in Figure 7.

Figure 7 – The mdatp_managed.json file manually placed in the /etc/opt/microsoft/mdatp/managed folder.
No restart of the Linux computer or of the mdatp daemon is necessary to make these settings effective after placing the file.
You can confirm your desired policy settings are effective by running the mdatp health command as seen in Figure 8.
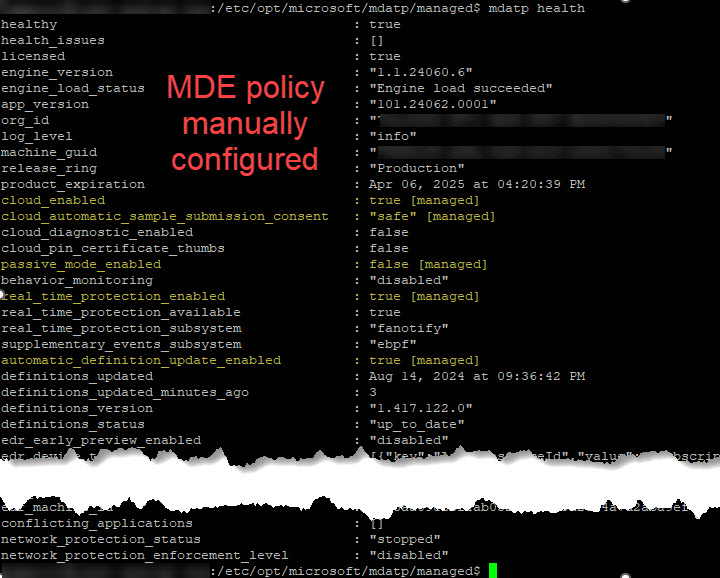
Figure 8 – Highlighted MDE.Linux settings with the [managed] label indicate success at placing the Linux server’s MDE in active mode.
Automatically configure MDE.Linux policy using an Endpoint Security Policy
Create a Linux-based Antivirus policy in the Microsoft Defender XDR portal at Endpoints -> Configuration management -> Endpoint security policies -> Create a new policy -> Linux -> Microsoft Defender Antivirus. Suggested settings are seen in Figure 9.
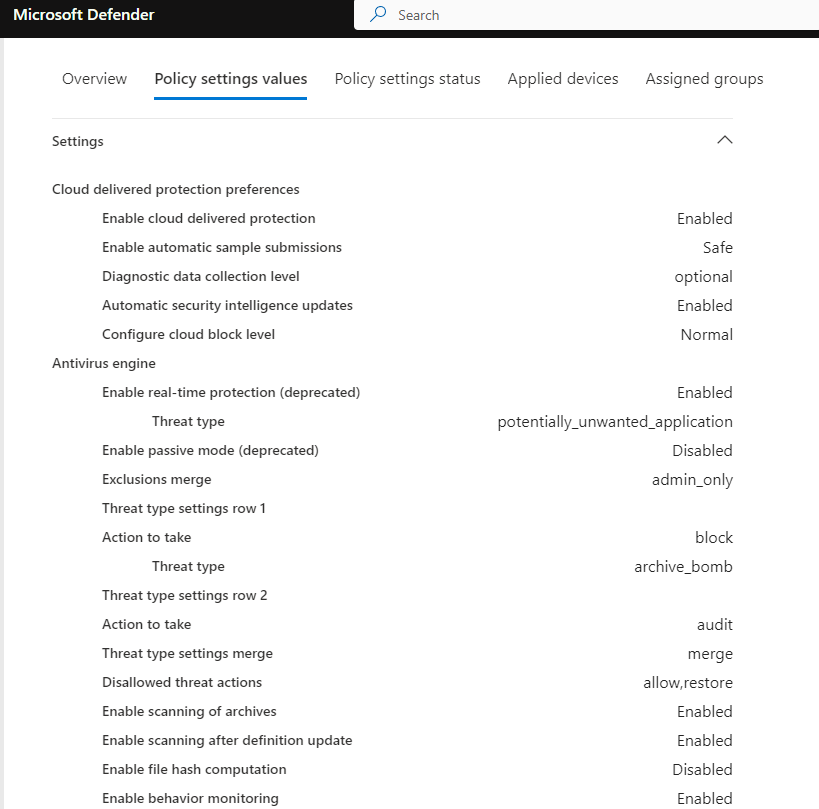
Figure 9 – Recommended settings for Microsoft Defender policy to manage Linux computers at scale.
To get the configuration file distributed to your target Linux server(s), create a device group in Entra ID that includes the server(s) and assign the policy to that group.
Once the policy has been delivered to the Linux computer, you will observe the presence of the policy file as seen in Figure 10.

Figure 10 – This policy file contains the settings you specified in the Microsoft Defender policy.
To confirm your desired policy settings are effective, run the mdatp health command as seen in Figure 10. Notice the managed_by “MDE” attribute when the policy was pushed using the Microsoft Defender XDR console.
![]()
Figure 11 – Highlighted MDE.Linux settings with the [managed] label indicate success at placing the Linux server’s MDE in active mode using Microsoft Defender policy.
Confirming and testing configuration of MDE.Linux
Using either the manual file or the automatic policy distribution method, within a few hours, the Defender Antivirus mode status will show as Active in the Microsoft Defender portal, Device health status (Figure 12):
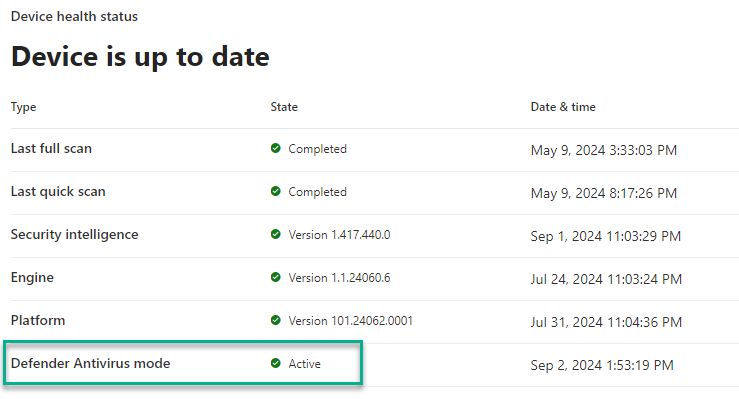
Figure 12 – Confirming Defender Antivirus mode is “Active” in the M365 Defender portal (Device Inventory -> computer -> Overview -> Device health status).
You can test that your Linux computer is properly onboarded and reporting to the service, using the familiar EICAR.COM test virus. When you attempt to save the file to the Linux computer, you will observe the action was positively blocked by the real-time protection, that is, the file was not saved. After detection, a new alert should appear in the portal after a few minutes (Figure 13).
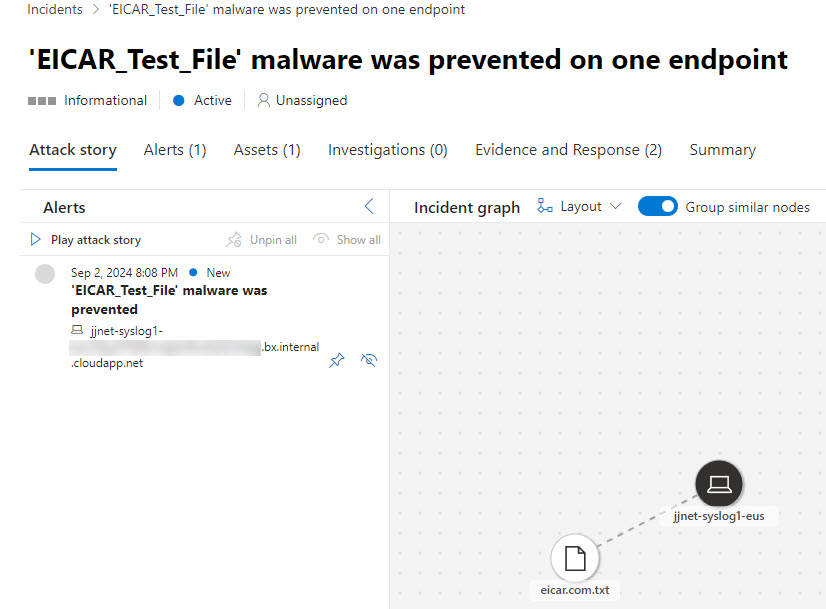
Figure 13 – Final confirmation using the EICAR.COM test virus that real-time protection for MDE.Linux is enabled.
For more information
Microsoft Defender for Endpoint on Linux
Deploy Microsoft Defender for Endpoint on Linux manually
Set preferences for Microsoft Defender for Endpoint on Linux
#MVPBuzz #DefenderForCloud #DefenderForServers #DefenderforEndpoint #EndpointSecurity #LinuxSecurity #Linux #Governance