
Integrate Azure Monitor alerts from servers with your ITSM system
Microsoft Azure Monitor is a superset of related Azure microservices covering all the bases in the IT disciplines of Observability and Availability and Performance Management of every imaginable PaaS, SaaS, and IaaS resource. Among the ‘resources’ that can be monitored are computers (VMs or physical servers): Both computers in Azure and computers running on-premises or in any other cloud such as VMware or AWS.
This article focuses on one specific use of Azure Monitor—Windows and Linux server monitoring—and how to get the most value from the solution by connecting Azure Monitor to your enterprise IT ticketing system. For network owners looking to replace their legacy server monitoring application(s), Azure Monitor can do the job including tight integration with any modern ITSM ticking system as illustrated in Figure 1.
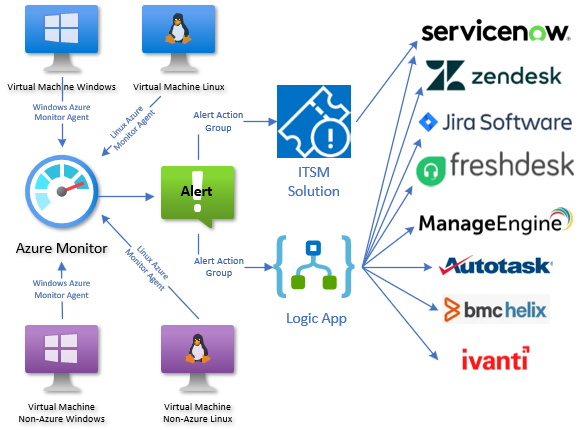
Figure 1 – Windows and Linux servers monitored by Azure Monitor with ticketing connections to leading ITSM products.
Many organizations have discovered that their legacy server monitoring tools can in fact be replaced by Azure Monitor with resultant tremendous cost saving–by no longer having to pay for a third-party server monitoring product. This is especially true for customers of Microsoft Sentinel, who may have already deployed the components underpinning Azure Monitor to connect servers to the Defender XDR SIEM.
Monitoring integration with ITSM
For almost all IT shops above a certain size as well as virtually all managed service providers (MSPs), front line operators and engineers don’t watch a specific server monitoring alert console, but rather they respond to tickets or incidents raised in an ITSM system. Having an effective Information Technology Service Management (ITSM) system is required for management of end-to-end IT service delivery to meet business goals, including the creation, delivery, and support of IT services.
Azure Monitor Action Groups
Azure Monitor alerting configuration includes the Action Group, which is a list of one or more notifications or actions to include:
- Email Azure Resource Manager Role
- Email/SMS message/Push/Voice
- Azure Automation Runbook (PowerShell or Python, In-Azure or Hybrid runbook worker)
- Azure Function
- Event Hub
- ITSM
- Logic app
- Secure Webhook
- Webhook
Each Azure Monitor alert rule is mapped to one or more action groups. You are at liberty to architect an ITSM connection using any of the action group action types, such as Event Hub or Webhook. This article will focus on the Logic app and ITSM actions as seen in Figure 2.
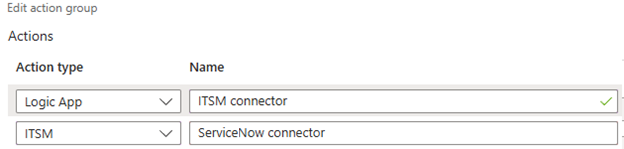
Figure 2 – Selecting Logic app and ITSM actions in an Azure Monitor action group configuration.
ITSM Action Group action
Azure Monitor action groups include the ITSM action type, which in the past, supported several different ITSM tools including Cherwell, Provance, and BMC Helix. However, currently only ServiceNow is supported for new ITSM connections, and the entire ITSM connector type is essentially deprecated.
Figure 3 shows the configuration page of a ServiceNow ITSM connection. Elements common to any ITSM connection include the URL to reach the ITSM API, the service principal (ClientID), and password (secret) for the ITSM account allowed access.
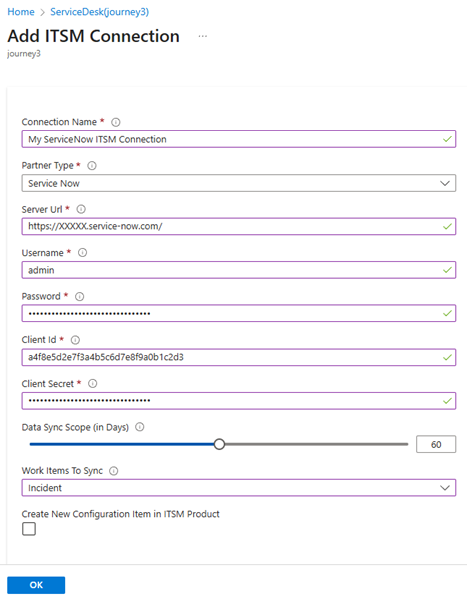
Figure 3 – Configuring the connection between a ServiceNow instance and the IT Service Management Connector (ITSMC) in Azure Monitor.
When you’re successfully connected and synced you can create incidents from log search alerts or log records, or from Azure alerts in this ServiceNow instance. The ITSM connector includes a dashboard as seen in Figure 4.
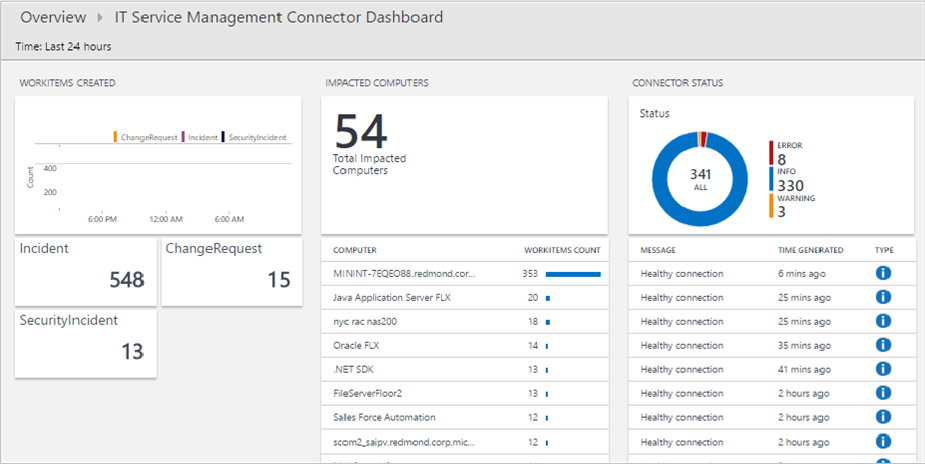
Figure 4 – Visualizing incident and change request data by using the ITSM dashboard in Azure Monitor. (Source: Microsoft)
Depreciation notice
The Azure Monitor ITSM connector for creating ServiceNow alerts is being retired. The deprecation process began in September 2022 and is scheduled for full retirement on September 30, 2025. While the ITSM connector creation process is still present in the Azure portal (November 2025), at this point the Azure Monitor ITSM connector for ServiceNow should only be created for concept validation. Any long-term connection between Azure Monitor and ServiceNow, similar to all other ITSM products, should take the form of a Logic app or another of the supported connecters, such as Webhook.
Logic app Action Group action
Azure Logic apps are the low-code ‘Swiss army knife’ of the Azure cloud. This platform offers over 1,400 prebuilt connectors to integrate with various apps and services. Each connector can have multiple operations or “actions” you can use in a workflow, such as “create a file” or “add an item”. If a workflow can be imagined, it can probably be accomplished by authoring a custom Logic app.
The Azure Logic app graphical interface is familiar to Microsoft Sentinel customers for automation rule playbooks and Microsoft Power BI customers for Power Automate flows. Logic apps are ideally suited as functional replacements for the deprecated ITSM connectors in Azure Monitor. Figure 5 is the overview page of a Logic app that is invoked by an Azure Monitor action group every time an Azure Monitor alert changes state. How to author such a customer Logic app (and a companion Logic app for bi-directional sync) is the primary topic of this article.
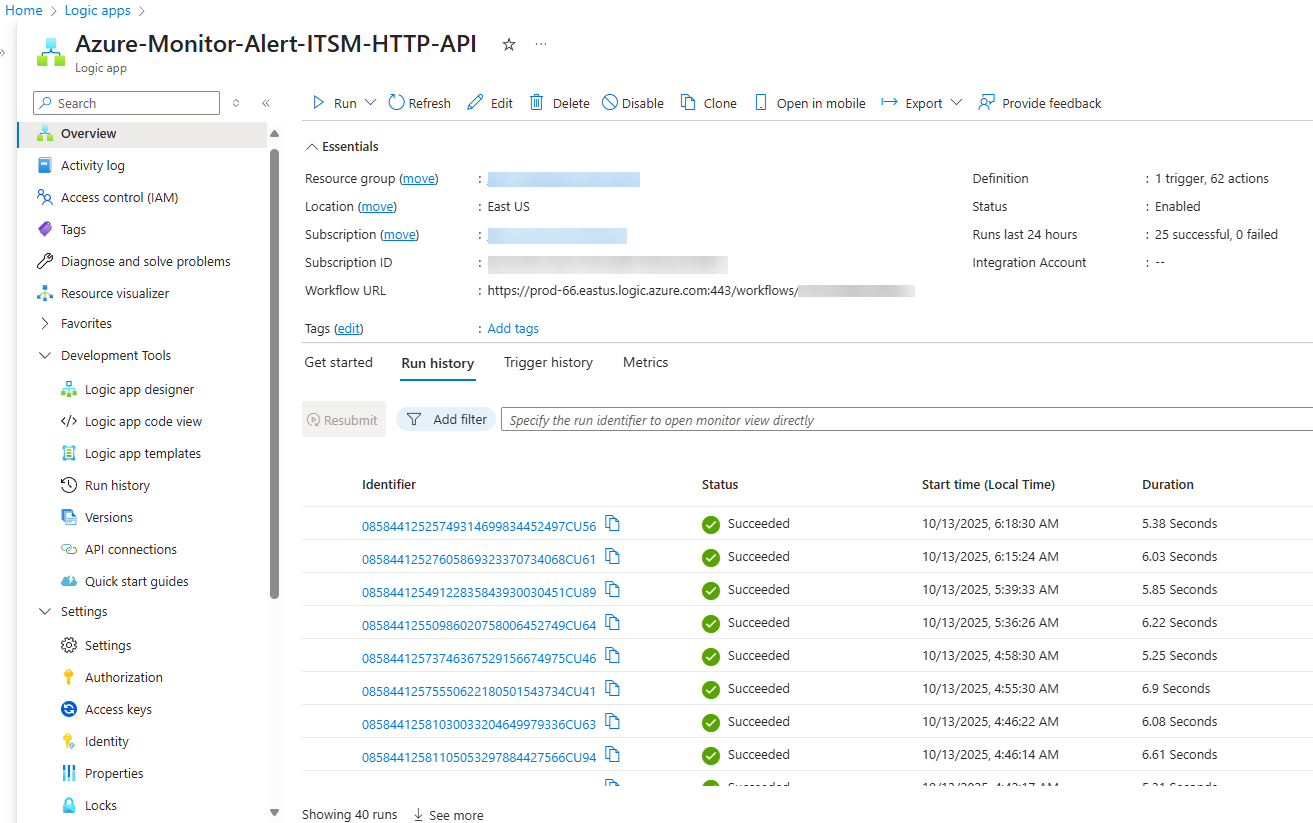
Figure 5 – Overview page of an Azure Logic app that is invoked every time an Azure Monitor alert changes state.
The Azure Monitor alert + ITSM ticket lifecycle
Every time a state change occurs in an Azure Monitor alert, one or more Action Group(s) can be fired if they are associated with the respective alert rule. You will be creating an Action Group that specifies a Logic app as an action task when an Azure Monitor alert condition changes. The Logic app will use HTTP REST API URIs for both the Azure management API and the ITSM API to view and update Azure Monitor alerts in both systems after alerts are fired.
Azure Monitor alert control points
Consider the control points of the Azure Monitor alert cycle in Table 1 as they relate to interfacing with an ITSM system.
| Control point | Possible values | Comments |
| Alert severity |
|
Defined by the Alert rule, can’t be changed after alert fires. |
| Alert condition |
|
Set automatically by the system, can’t be changed by the user |
| User response |
|
Fully and only user-controlled. When changing user response, a comment can be optionally added to the alert history. |
Table 1 – Azure Monitor alert control points.
Your custom ITSM Logic app will likely key on all of these control points, filtering and branching as appropriate given the alert severity, alert state, and user response. Figure 6, annotated from the Azure Monitor alert console, illustrates the variety of alert metadata at play in the ‘alert + ticket’ lifecycle.
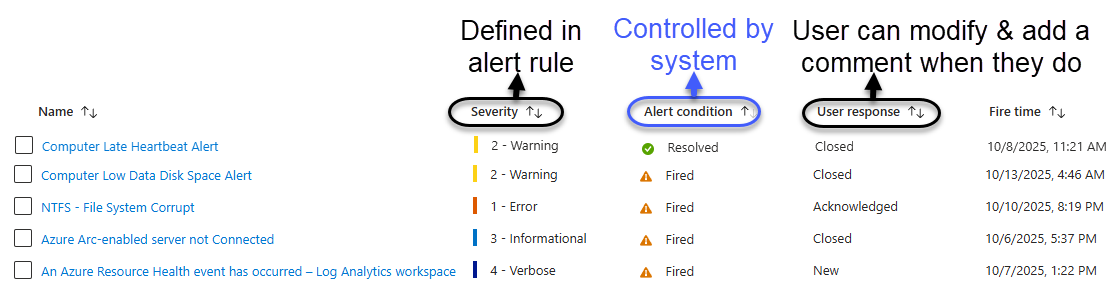
Figure 6 – Azure Monitor alert severity, alert condition, and user response are the moving parts we have to work with.
Azure Monitor alert signal types
In addition to handling these alert control points, the ITSM Logic app also needs to accommodate the different types of Azure Monitor alerts that will arise from managing Windows and Linux servers with Azure Monitor.
- Log alerts from Log Analytics query (examples: VMInsights performance, Event log records)
- Log alerts from Azure Resource Graph (ARG) query (example: Azure Arc server connection status)
- Metric alerts from Azure platform (example: Loss of Azure Monitor Agent heartbeat from a server)
Note: There are other types of Azure Monitor alerts, such as AppInsights Smart detection alerts and activity or platform service and resource health alerts. ITSM support for these types of Azure Monitor alerts is outside the scope of this server-focused solution. You could add such support by extending the Logic apps supplied with this solution or writing new but similar Logic apps dedicated to alerts not sourced from server-based monitoring.
Other Azure service dependencies
There are at least two Azure artifacts beyond the Alert Rule and the Action Group that should be included in your ITSM Logic app design:
- Azure Monitor Alert processing rules: Check for the presence of an enabled alert suppression rule, and if found, take no action.
- Azure Key Vault: Store the information needed to securely connect with your ITSM system such as the API integration code, API secret, and API username/service principal name.
Bi-directional support
Most of the relevant actions in our scenario are generated from the Azure side, such as when an alert is first fired, and when/if the alert is changed to a Closed state by Azure Monitor. Not all alerts can be automatically closed by Azure Monitor—only alert rules that support a corrective threshold and with the “Automatically resolve alerts” setting enabled will ever transition from Fired to Resolved.
However, when we consider that the ultimate source of truth for alert user responses is the ITSM ticket, we need to keep the Azure Monitor alert history synchronized with the ITSM ticket status. This is accomplished by staging a trigger action (or ‘automation rule’) within the ITSM application that launches a webhook when an Azure Monitor ITSM ticket is marked Completed in the ITSM system.
Authoring your Azure Monitor ⬄ ITSM system Logic apps
Each organization’s environment and their unique business needs and ITSM system(s) will drive customized Logic apps in every case. I have provided code samples in my GitHub for this concept that deploy a framework, which after customization, will interoperate with any given ITSM application. The deployed code should be able to be modified without too much work for any modern ITSM system that has a REST API endpoint. Table 2 lists reference links for REST APIs for leading ITSM products:
Table 2 – REST API documentation for many leading ITSM products.
Capacity considerations for very large environments
This solution is based on Azure Logic apps, which do have high-end limits regarding throughput and concurrency. If your environment might exceed 1,000 tickets per minute, consult this link for best practice recommendations to modify and extend Logic app configurations to support extremely large compute demands.
Project plan to deploy and customize the solution in your environment
These are recommended project steps to deploy and customize the solution:
- Create a service principal in the ITSM application and user-assigned managed identity in Azure.
- Get data from the ITSM needed for API connection.
- Create an Azure Key vault and populate it with necessary data and secret to connect to the ITSM API.
- Grant the Azure service principal RBAC permission to read secrets from the Key vault.
- Create and authorize the Logic app API connection to Key vault.
- Deploy the two (2) Logic apps from my GitHub account.
- Add the outbound IP ranges of the Logic app Azure-Monitor-Alert-ITSM-HTTP-API to the Firewall of the Key vault.
- Customize the Logic apps’ parameters to fit your organization.
- Customize the Logic apps’ ticket creation and ticket update “HTTP” task outputs to match expected and desired data fields relevant to your ITSM application.
- Create an Action group that includes the Logic app Azure-Monitor-Alert-ITSM-HTTP-API as an action and associate the Action group with one or more Azure Monitor alert rules.
- Cause Azure Monitor alerts to fire and observe Logic app behavior.
- For each of the Log Analytics, Azure Resource Graph, and Metric alert types, continue to customize the text transformation tasks of Logic app Azure-Monitor-Alert-ITSM-HTTP-API until ITSM tickets are correctly created and updated in all scenarios.
- Configure your ITSM to launch the webhook URL of the Logic app Azure-Monitor-Close-ITSM-HTTP-API for each Azure Monitor ticket that is marked completed in the ITSM.
- Enable Secure inputs and outputs for the Key vault tasks in the Logic app Azure-Monitor-Alert-ITSM-HTTP-API.
Solution Deployment Step by Step
The rest of this article will cover each of the steps in the project plan.
1 – Create a service principal in the ITSM application and user-assigned managed identity in Azure
Have your ITSM administrator create a service principal or user account in the ITSM application that has rights in the ITSM to open, modify, and complete tickets as well as read company, customer, and configuration item data in the ITSM database.
Additionally, you will need to create a service principal (managed identity) in your Entra ID tenant that will be given RBAC roles necessary to read and modify Azure Monitor alerts. This PowerShell will create a user-assigned managed identity named “ITSM-MI” for this purpose:
     New-AzUserAssignedIdentity `
          -ResourceGroupName "<Resource Group name>" `
          -Name "ITSM-MI" -Location "<region>"
Next grant the managed identity RBAC permissions to the subscription. This PowerShell will assign the Reader and Monitoring Contributor roles to the managed identity:
     $subscriptionId = "<Subscription ID>"
     $MIObjectId = (Get-AzADServicePrincipal -DisplayName "ITSM-MI").id
     $AzRoleId = (Get-AzRoleDefinition -Name "Reader").id
     New-AzRoleAssignment -ObjectId $MIObjectID `
          -RoleDefinitionId $AzRoleId `
          -Scope /subscriptions/$subscriptionId
     $AzRoleId = (Get-AzRoleDefinition -Name "Monitoring Contributor").id
     New-AzRoleAssignment -ObjectId $MIObjectID `
          -RoleDefinitionId $AzRoleId `
          -Scope /subscriptions/$subscriptionId
Confirm the access is granted by typing “ITSM-MI” in the Role assignments tab of the Azure subscription -> Access control (IAM) as seen in Figure 7.
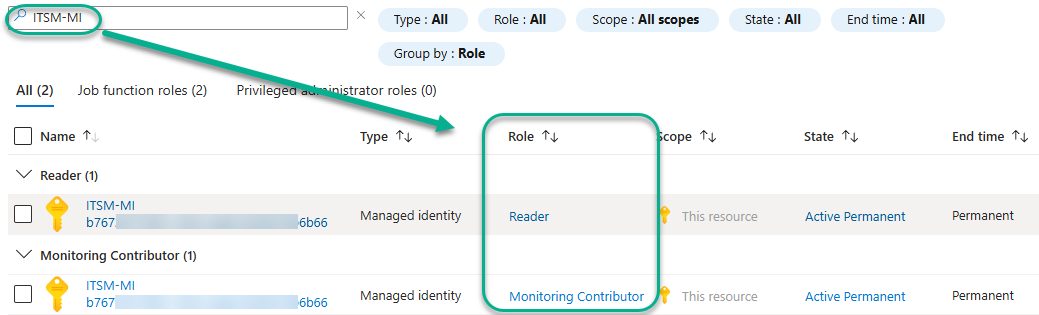
Figure 7 – Azure RBAC roles in the subscription for the service principal (Managed identity) that will update Azure Monitor alerts.
2. Get data from the ITSM needed for API connection
- Establish the correct URL for Azure Logic app to connect to the ITSM API, this is referred to as the ITSM Integration Code. An example might be https://MyCompany.MyItsm.com/api.
- From your ITSM administrator, obtain the Username (service principal name or GUID) and password (secret) needed to read and post data to the ITSM API.
- Obtain other parameters needed for ticket creation with the ITSM API. The Logic app assumes there is a Company ID and Queue ID associated with the place in the ITSM where tickets should be created. If your ITSM has additional or different parameters of this nature, take note of them and you will customize the ticket creation step in the Logic app later with this information.
- While the service principal on the Azure side is a Managed identity without an associated token, secret, or expiration date, the service principal created on the ITSM side may have an expiration date. If this is the case, be sure and create a scheduled maintenance task to renew the ITSM access token or secret before the expiration date.
3. Create an Azure Key vault and populate it with necessary data and secret to connect to the ITSM API.
As a security best practice, it is important that the secret used to connect to the ITSM system from Azure is protected against inadvertent or unauthorized disclosure.
This PowerShell will create the Key vault and grant your user account permission to add secrets:
     $keyVaultName = "itsm-kv"
     $keyVaultLocation = "<region>"
     $resourceGroupName = "<resource-group-name>"
     $userEmail = "<your-user-upn>"
     New-AzKeyVault -Name $keyVaultName -ResourceGroupName $resourceGroupName `
          -Location $keyVaultLocation
$keyVault = Get-AzKeyVault -VaultName $keyVaultName -ResourceGroupName $resourceGroupName
$roleDefinition = Get-AzRoleDefinition -Name 'Key Vault Secrets Officer'
     New-AzRoleAssignment -ObjectId (Get-AzADUser -UserPrincipalName $userEmail).Id `
          -RoleDefinitionName $roleDefinition.Name -Scope $keyVault.ResourceId
This PowerShell will add the necessary data and secret to connect to the ITSM API (enter the password for the service principal when prompted):
$keyVaultName = "itsm-kv"
     $SecretValue = "<API Integration Code>"
     $Secretvalue = ConvertTo-SecureString $SecretValue -AsPlainText -Force
     $SetSecret = Set-AzKeyVaultSecret -VaultName $keyVaultName `
          -Name "ItsmApiIntegrationCode" -SecretValue $secretvalue
     $SecretValue = "<API Service Principal Name>"
     $Secretvalue = ConvertTo-SecureString $SecretValue -AsPlainText -Force
     $SetSecret = Set-AzKeyVaultSecret -VaultName $keyVaultName -Name "ItsmApiUserName" `
          -SecretValue $secretvalue
     $secretvalue = Read-Host -Prompt 'Enter the service principal password' -AsSecureString
     $secret = Set-AzKeyVaultSecret -VaultName $keyVaultName -Name "ItsmApiSecret" `
          -SecretValue $secretvalue
After creating the secrets in your key vault, you should see a list like Figure 8 in the Azure portal:
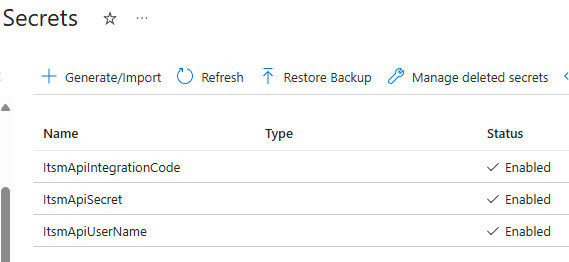
Figure 8 – Secrets needed by the Logic app to access the ITSM API are stored in Key vault.
4. Grant the Azure service principal RBAC permission to read secrets from the Key vault.
This PowerShell will assign the necessary role:
$MIObjectId = (Get-AzADServicePrincipal -DisplayName "ITSM-MI").id
$AzRoleId = (Get-AzRoleDefinition -Name "Key Vault Secrets User").id
     New-AzRoleAssignment -ObjectId $MIObjectID `
          -RoleDefinitionId $AzRoleId `
          -Scope "/subscriptions/<subscription-id>/resourceGroups/<resource-group-name>/providers/Microsoft.KeyVault/vaults/itsm-kv"
View the correct Key vault Access control Role assignment as seen in Figure 9.

Figure 9 – Verifying the Key Vault Secrets User role assigned to the user-assigned managed identity.
5. Create the API connection the Logic app uses to connect to Key vault.
API connections in Azure Logic apps serve as the bridge between Logic app workflows and various external services, applications, and systems. The Logic app is ‘hard coded’ with a Key vault name and an API connection name so that no further API connection configuration should be required after deploying the Logic app itself. This PowerShell will pre-create the Logic app API connection to interact with the Key vault where the ITSM secrets are stored.
     $resourceGroupName = "<resource-group-name>"
     $logicAppName = "Azure-Monitor-Alert-ITSM-HTTP-API"
     $keyVaultName = "itsm-kv"
     $location = "<region>"
     $connectionName = "itsm-keyvault-connection-mi"
     $apiId = "/subscriptions/<subscription>/providers/Microsoft.Web/locations/<region>/managedApis/keyvault"
New-AzResource -ResourceGroupName $resourceGroupName `
        -ResourceName $connectionName `
        -Location $location `
        -ResourceType "Microsoft.Web/connections" `
        -Properties @{
            displayName = "$logicAppName-to-keyvault"
            api = @{
                name = "itsm-keyvault-api"
                id = $apiId
            }
            parameterValueSet = @{
                name = "oauthMI"
                values = @{
                    vaultName = @{
                        value = $keyVaultName
                    }
                }
            }
        }
You can verify the creation of the API connection in the Azure portal as seen in Figure 10.

Figure 10 – API connection pre-created to use with the Logic app Azure-Monitor-Alert-ITSM-HTTP-API.
The API connection is of the Managed identity type, so there are no tokens or secrets and no expiration date to manage.
This API connection resource is specially named to work automatically with the Key vault, the Logic app, and the Managed identity, all of which are assigned specific names in this solution.
Tip: If you want to use your own names for the artifacts in this solution, I recommend you deploy the solution “as with” with the built-in names. Later, you can redeploy the solution using your own names, but you will have a working reference copy to verify against.
6. Deploy the two (2) Logic apps from my GitHub account.
Navigate to the https://github.com/john-joyner/Microsoft.Logic repository and locate Integrate Azure Monitor alerts with your ITSM Solution. Observe the two (2) blue Deploy to Azure and Deploy to Azure Gov buttons for each of the Logic apps as seen in Figure 11.
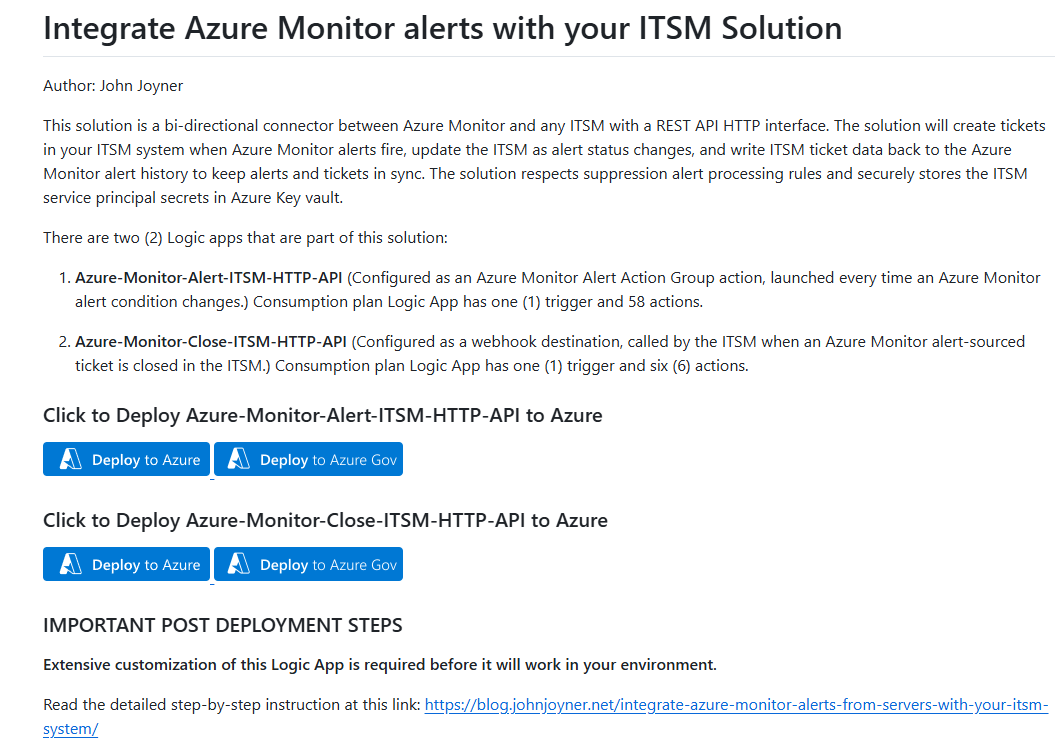
Figure 11 – GitHub deployment page for the Logic apps in the solution.
Deploy the Logic app Azure_Monitor_Alert_ITSM_HTTP_API
After pressing the appropriate deploy button (Azure or Azure Gov) you will arrive at the Custom deployment page in the Azure portal as seen in Figure 12.
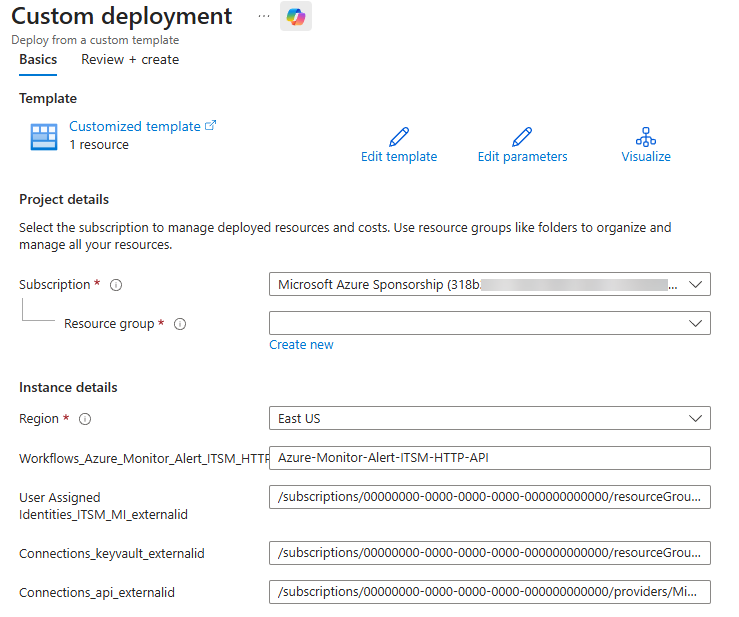
Figure 12 – Instance details of Azure_Monitor_Alert_ITSM_HTTP_API to be confirmed before creating the Logic app.
Aside from the Subscription to confirm and the Resource group to select, the following instance details require attention:
- Region: confirm or change as appropriate for your environment.
- Workflows_Azure_Monitor_Alert_ITSM_HTTP_API_name: Defaults to “Azure-Monitor-Alert-ITSM-HTTP-API” which will be the name of the Logic app, recommend do not change this.
- User Assigned Identities_ITSM_MI_externalid: Substitute your Subscription ID and your Resource group name in this value:
"/subscriptions/00000000-0000-0000-0000-000000000000/resourceGroups/<MyResourceGroup>/providers/Microsoft.ManagedIdentity/userAssignedIdentities/ITSM-MI"
- Connections_keyvault_externalid: Substitute your Subscription ID and your Resource group name in this value:
"/subscriptions/00000000-0000-0000-0000-000000000000/resourceGroups/<MyResourceGroup>/providers/Microsoft.Web/connections/itsm-keyvault-connection-mi"
- Connections_api_externalid: Substitute your Subscription ID and your location name (such as ‘eastus’) in this value:
"/subscriptions/00000000-0000-0000-0000-000000000000/providers/Microsoft.Web/locations/<MyRegion>/managedApis/keyvault"
Press the Review + create button after entering and confirming your information. The Logic app will deploy into the specified subscription and resource group. Figure 13 is a high-level flowchart showing how the Logic app works.
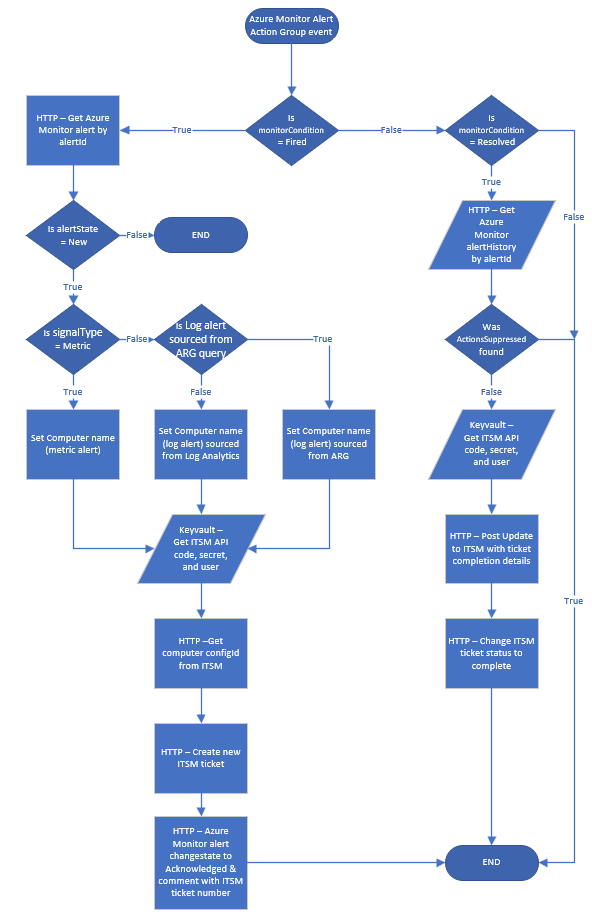
Figure 13 – High-level flowchart view of the Logic app Azure-Monitor-Alert-ITSM-HTTP-API.
Logic app functional description
This Logic app is staged in an Azure Monitor Alert Action Group to be invoked when an Azure Monitor alert changes condition (“Fired” and “Resolved”). The purpose of this Logic app is to interact with the ITSM system to open new ITSM tickets and change the Azure Monitor alert state from “New” to “Acknowledged”, then update corresponding ITSM tickets when Azure Monitor alerts are auto-resolved. Before creating the ticket, the Logic app retrieves asset information about the Computer that is the subject of the alert, so that the ticket can be opened under the context of the affected server.
Deploy the Logic app Azure_Monitor_Close_ITSM_HTTP_API
After pressing the appropriate deploy button (Azure or Azure Gov) you will arrive at the Custom deployment page in the Azure portal as seen in Figure 14.
Figure 14 – Instance details of Azure_Monitor_Close_ITSM_HTTP_API to be confirmed before creating the Logic app.
Aside from the Subscription to confirm and the Resource group to select, the following instance details require attention:
- Region: confirm or change as appropriate for your environment.
- Workflows_Azure_Monitor_Close_ITSM_HTTP_API_name: Defaults to “Azure-Monitor-Close-ITSM-HTTP-API” which will be the name of the Logic app, recommend do not change this.
- SubscriptionId: The default code “[subscription().subscriptionId]” means to use the same subscription information as is selected in the Subscription dropdown. Change if you are deploying to a different subscription.
- User Assigned Identities_ITSM_MI_externalid: Substitute your Subscription ID and your Resource group name in this value:
"/subscriptions/00000000-0000-0000-0000-000000000000/resourceGroups/<MyResourceGroup>/providers/Microsoft.ManagedIdentity/userAssignedIdentities/ITSM-MI"
Press the Review + create button after entering and confirming your information. The Logic app will deploy into the specified subscription and resource group. Figure 15 is a high-level flowchart showing how the Logic app works.
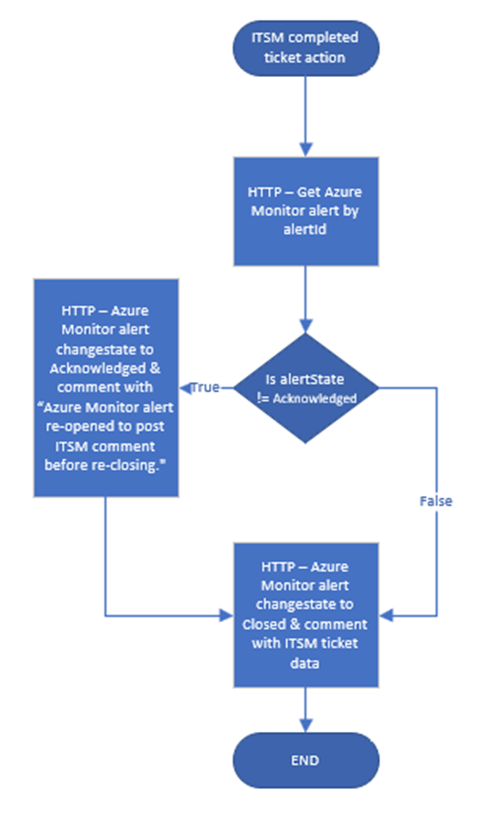
Figure 15 – High-level flowchart view of the Logic app Azure-Monitor-Alert-ITSM-HTTP-API.
Logic app functional description
The webhook URL to this Logic app is staged in the ITSM system’s automation to be invoked when an ITSM ticket sourced from Azure Monitor is marked completed. The main purpose of this Logic app is to keep the [Azure Monitor Alert “Closed”] <-> [ITSM Ticket “Completed”] status in sync. The Logic app also comments the alert history with the ITSM ticket number and other monitoring metadata information desired to document in the alert.
7. Add the outbound IP ranges of the Logic app Azure-Monitor-Alert-ITSM-HTTP-API to the Firewall of the Key vault.
As an additional security best practice, we want to restrict access to the Key vault to specific IP addresses and subnets. Navigate to the Settings -> Properties page of the Logic app Azure-Monitor-Alert-ITSM-HTTP-API and copy the list of Connector outgoing IP addresses as seen in Figure 16.
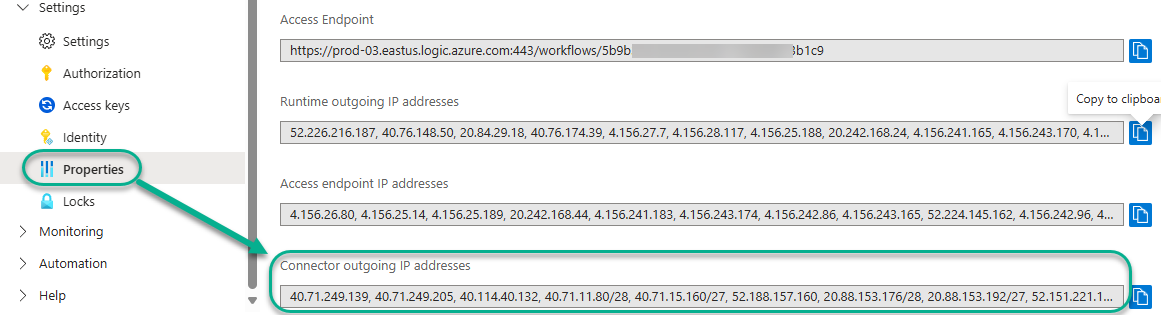
Figure 16 – Locate the Connector outgoing IP addresses in the Logic app Azure-Monitor-Alert-ITSM-HTTP-API.
Transcribe the list of IP addresses to this example PowerShell (your addresses will be different from this example). Also add your personal IP address of your browser so that you can view the Key vault data in the Azure portal.
     Add-AzKeyVaultNetworkRule -VaultName "itsm-kv" -IpAddressRange "40.71.249.139"
     Add-AzKeyVaultNetworkRule -VaultName "itsm-kv" -IpAddressRange "40.71.249.205"
     Add-AzKeyVaultNetworkRule -VaultName "itsm-kv" -IpAddressRange "40.114.40.132"
     [etc.]
Navigate to the Settings -> Networking -> Firewalls and virtual networks tab of the Key vault, select “Allow public access from specific virtual networks and IP addresses”, verify the desired address list is present in the Firewall IP address list as seen in Figure 17, and push Apply.
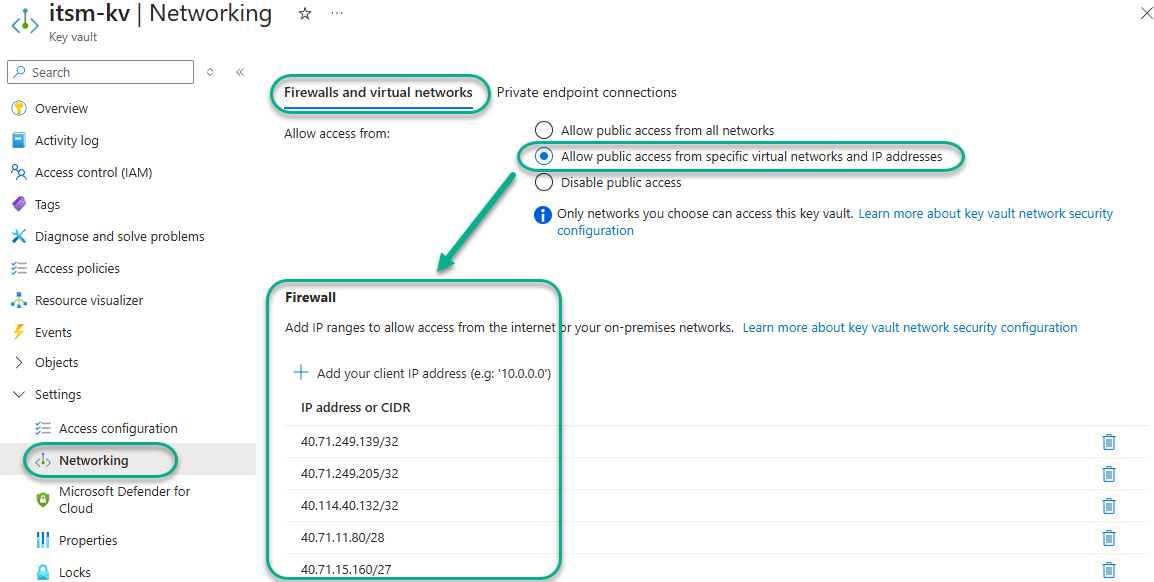
Figure 17 – Adding your own public IP and the Logic app’s Connector outgoing IP addresses to the local firewall of the Key vault.
8. Customize the Logic apps’ parameters to fit your organization.
After Logic app deployment, there are three (3) parameters in the Logic app Azure-Monitor-Alert-ITSM-HTTP-API. These parameters (or other similar parameters customized for your ITSM) must be specified for the Logic app to work.
- ITSMcompanyId
- ITSMqueueId
- ManagedIdentityResourceId
The parameters ITSMcompanyId and ITSMqueueId default to zero (“0”). ManagedIdentityResourceId is pre-populated with the value of the parameter userAssignedIdentities_ITSM_MI_externalid furnished during deployment of the Logic app.
There is one (1) parameter in the Logic app Azure-Monitor-Close-ITSM-HTTP-API:
- subscriptionId
The subscriptionId parameter is pre-populated with the value of the parameter subscriptionId furnished during deployment of the Logic app.
Find the parameters in the Logic app designer edit views as seen in Figure 18.

Figure 18 – Parameters for the Azure Monitor “Alert” (left) and “Close” (right) ITSM API Logic apps.
- ITSMcompanyId refers to an account or code used to identify the company, business unit, or other administrative group within the ITSM that the alert belongs to.
- ITSMqueueId refers to a team, task queue, SLA, or other class of service provided by the support organization.
The ITSM company ID and ITSM queue ID are the two values needed to open a ticket correctly in the ITSM system. Your ITSM system may require fewer, more, or different inputs to create a ticket as you desire. Customize the selection and names of parameters as suits the needs and characteristics of your ITSM system.
Note: The Logic apps deploy in a Disabled state and with Access Control Configuration Allowed inbound IP address settings enabled to comply with a Zero Trust model. When you are ready, Enable the Logic apps and customize the Access Control Configuration of both Logic apps so you can begin to test them.
9. Customize the Logic apps’ ticket creation and ticket update “HTTP” task outputs to match expected and desired data fields relevant to your ITSM application.
You will need to work closely with the administrators if your ITSM application to confirm the ticket schema and which data elements are required to open a ticket for the correct computer, in the proper ticket queue, and in the name of the correct customer, business unit, and/or distributed application.
Get computer configID from ITSM
The first interaction we have with the ITSM is when we pre-fetch the configuration item from the ITSM that represents the computer raising the alert, so that the ITSM ticket can be correctly associated with that computer in the ITSM. Figure 19 shows the Logic app task where we request this information from the ITSM.
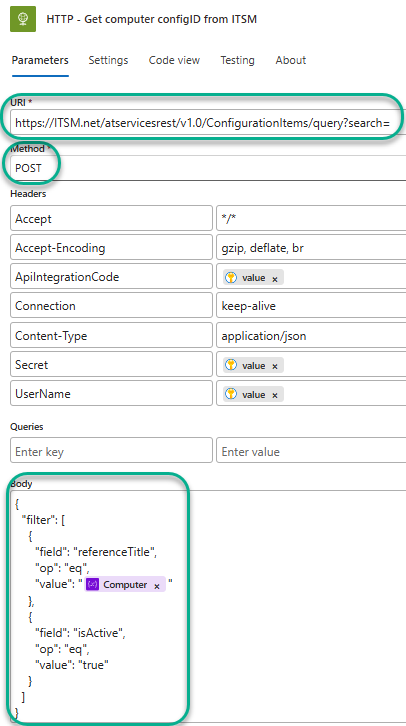
Figure 19 – Logic app task HTTP – Get computer configID from ITSM pre-fetches the computer’s configuration from the ITSM.
You will need to customize this task with the following information specific to your ITSM application:
- URI and Method: This will vary by your ITSM application’s design. The default example is a POST command to the ITSM API running a query search based on the computer name.
- Body: Again, varies by your ITSM’s configuration schema. The default example provides the Computer name in the Azure Monitor alert as the “referenceTitle” for the query and checks that the configuration is active in the ITSM.
The “body” of the expected reply to this query is a ‘dump’ of all the configuration data related to the computer in the ITSM. This list may include hundreds of values related to the computers’ hardware, software, and distributed applications. The default example is that the “configID” of the computer (a numeric code) is what we are looking for and will need to open the ticket. (The Set variable – configID task in the Logic app retrieves just the value of the ConfigID from the long list of values retuned by the HTTP task.)
Create new ITSM ticket
The next interaction with the ITSM is to actually raise the new ticket in the ITSM system. Figure 20 shows the Logic app task where we post a new ticket to the ITSM.
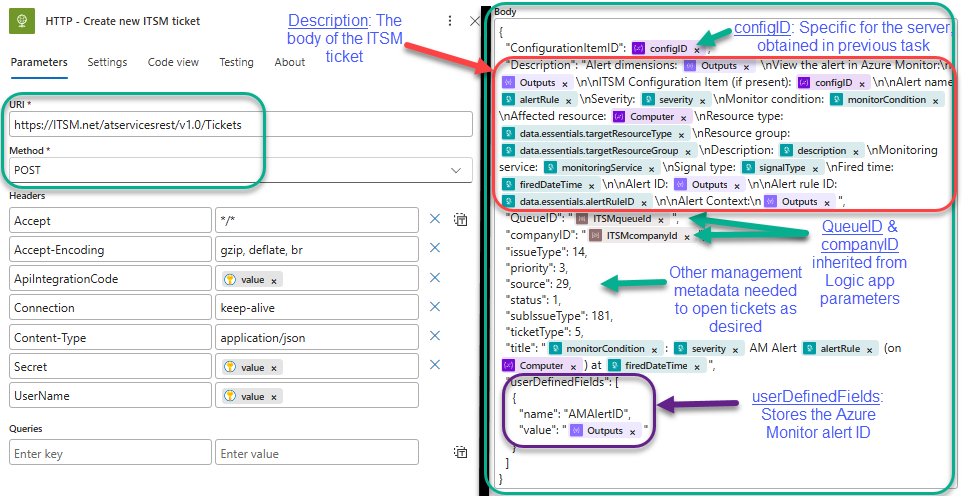
Figure 20 – Creating the ITSM ticket using all the collected and processed information from Azure Monitor and the ITSM.
You will need to customize this task with the following information specific to your ITSM application:
- URI and Method: This will vary by your ITSM application’s design. The default example is a POST command to the ITSM API creating a new ticket.
- Body: Again, varies by your ITSM’s ticket schema. The default example provides this information as indicated in Figure 21:
- ConfigurationItemID: This is the number or code obtained in the previous task from the ITSM that represents the computer that raised the alert.
- Description: Exactly what you want to see in the body of your ITSM ticket.
- QueueID and companyID: Inherited from the parameters of the Logic app.
- Other management metadata needed to open tickets as desired.
- userDefinedFields: We establish the “AMAlertID” attribute that the ITSM will use to store the value of the Azure Monitor Alert ID that generated the ticket.
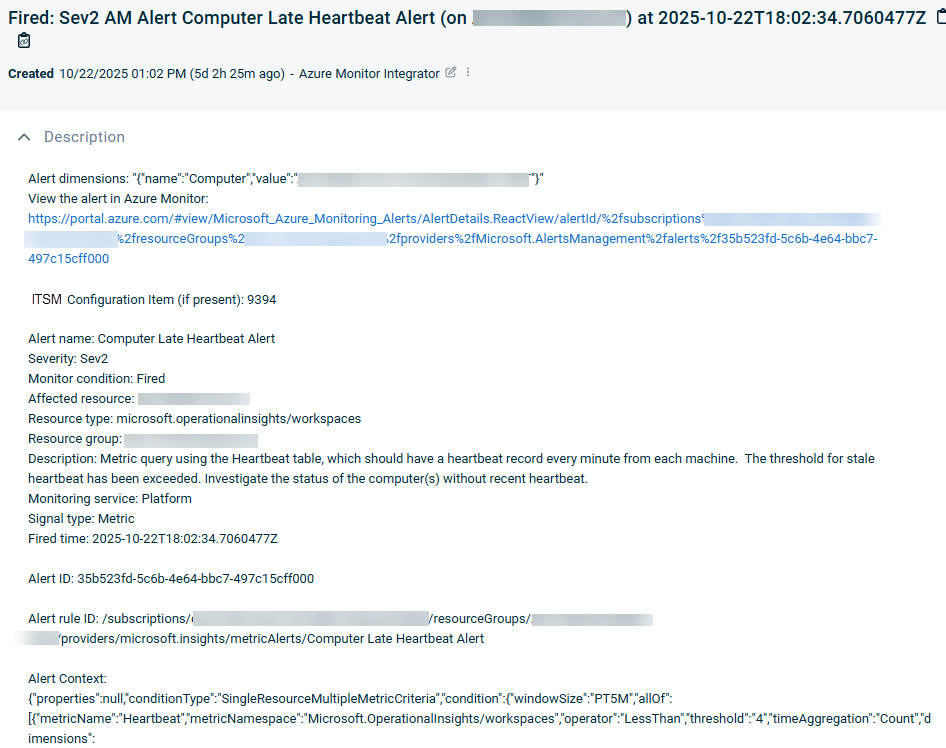
Figure 21 – The body of an ITSM ticket sourced from Azure Monitor and created by the Logic app using the ITSM’s API.
Figure 21 is a representative sample of what an Azure Monitor alert might look like in your ITSM console. You are the author of what your ITSM ticket will look like: It is the “Description” field of the Logic App task HTTP – Create new ITSM ticket.
At this stage, don’t worry too much about understanding all the values or vetting all the details. Once you get to step 11 (“Cause Azure Monitor alerts to fire and observe Logic app behavior”) you will have live data to interactively narrow in on your final design.
10. Create an Action group that includes the Logic app Azure-Monitor-Alert-ITSM-HTTP-API as an action and associate the Action group with one or more Azure Monitor alert rules.
Navigate in the Azure portal to Monitor -> Alerts -> Action groups and push +Create. Enter an Action group name (such as “WinSrv Alerts Action Group” for Windows Server alerts), select the Logic app Action type, then specify the Azure-Monitor-Alert-ITSM-HTTP-API Logic app and click Yes to enable the common alert schema as seen in Figure 22.
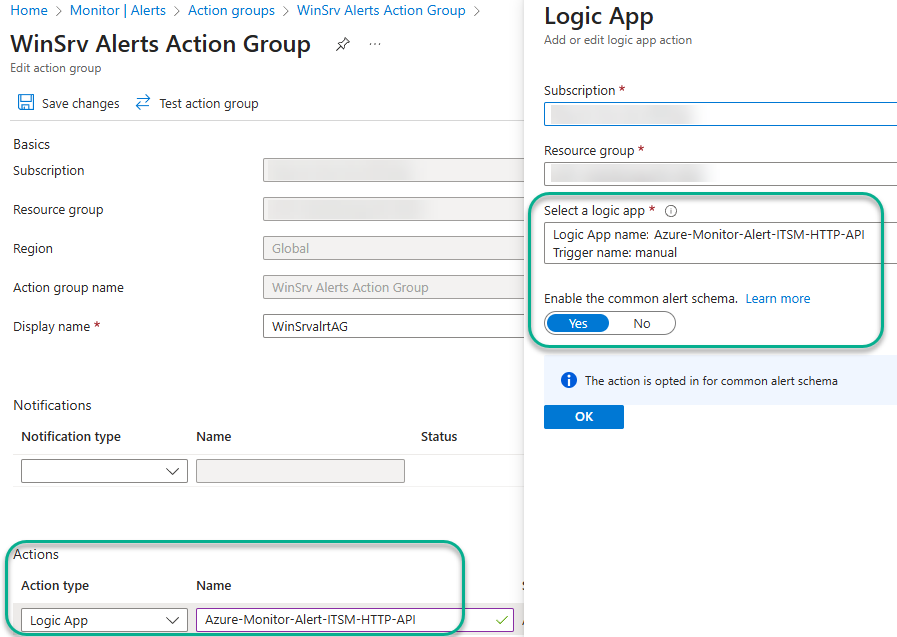
Figure 22 – Associating the Logic app with the Windows Servers alert action group.
Creating the Azure Monitor Alert Action group is only half the work, the Action group must also be specified as an Action in the definition of one or more Azure Monitor Alert rules. Pick an Azure Monitor alert rule that can easily be caused to fire during testing, such as Computer Late Heartbeat Alert, and add the Alert Action Group as an Action as seen in Figure 23.
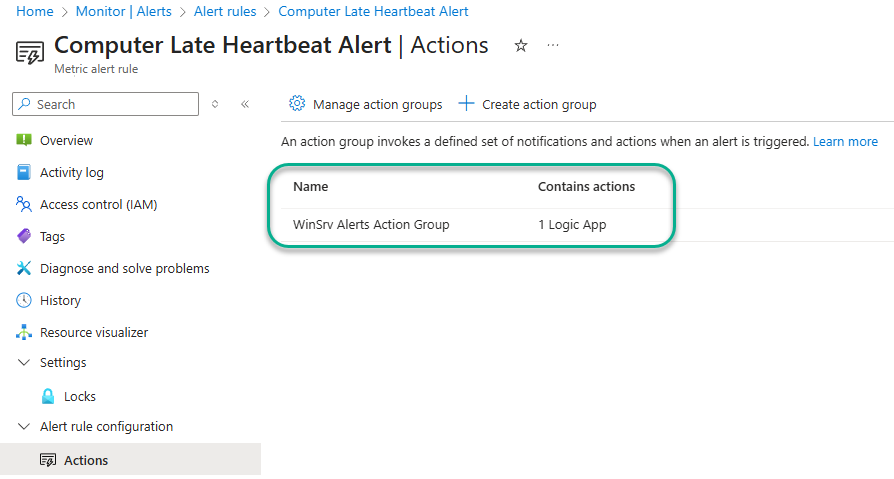
Figure 23 – In this configuration, the WinSrv Alerts Action Group will be invoked when the Azure Monitor fires, and again when and if the alert is resolved by the system.
11. Cause Azure Monitor alerts to fire and observe Logic app behavior.
In the sample step-by-step project plan we have been following, you should be in a position to shutdown a test server that is being monitored by the Computer Late Heartbeat Alert rule. You should observe your Logic app launching and most likely failing due to the Logic app not being fully configured. However, even in failing, your Logic app will capture important real-world data you will use to tailor and fine-tune the solution so that it works as desired in your environment after customization.
After the Logic app has run, navigate to Azure-Monitor-Alert-Autotask-HTTP-API -> Development Tools -> Run history and click the Status of the run. This opens a Logic app run window. Select the trigger task at the top of the Logic app then click Show raw outputs. This opens the raw output view of the Azure Monitor alert as seen in Figure 24.
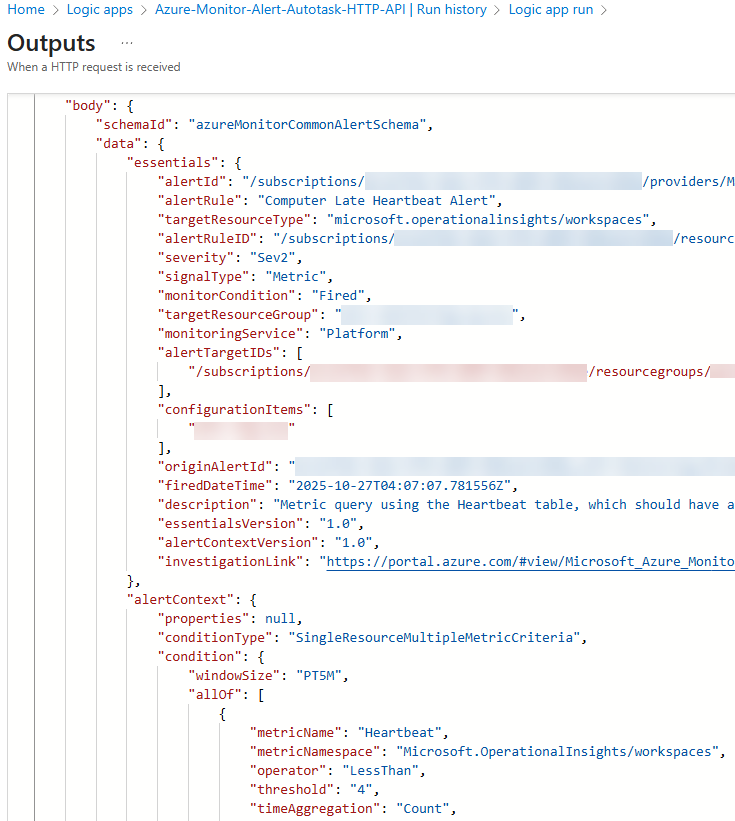
Figure 24 – Studying the raw output of the first task in the Logic app, which is the trigger task and contains a dump of the complete alert.
Figure 24 illustrates where we are starting from: The complete Azure Monitor alert ‘dump’. The rest of the Logic app takes this data and filters and transforms the raw data into formats that match up with the ITSM ticket schema so we can create an ITSM ticket using the ITSM API.
Creating inputs to the ITSM that will work
Notice the format of the raw alert: It is a JSON document, composed of section headers (branch objects), like alertContext and condition, and attributes (leaf objects), which are “name” : “value” pairs, with the value usually being of the String or Array type, like “metricName” : “Heartbeat”.
The allowable sections and attributes and their exact formatting requirements are defined in the Azure Monitor alert schema(s). Often, we need to filter out some or all of the JSON except for the raw value of one attribute that is needed to create or update a field in the ITSM ticket. Now we will cover three (3) techniques you can use to extract and isolate specific text strings or other values from JSON outputs of Logic app tasks: Nested property access, Array index values, and Compose task series.
Technique #1 – Filtering JSON by using nested property access
Sometimes, we can specify an expression that leverages JSON nested annotations to select just the attribute value that we are seeking. This technique can be seen in Figure 25, which we first saw in Figure 20, which is the Logic app task that creates the ITSM ticket (the name of the task is HTTP – Create new ITSM ticket.)
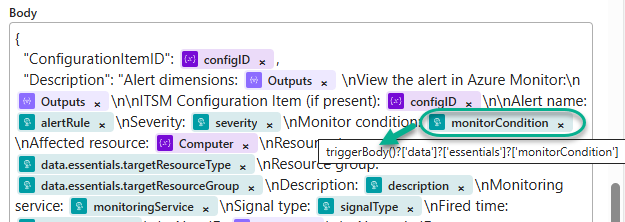
Figure 25 – A value in the Body of a REST API POST task, provided by walking the JSON branches to the attribute name.
You can compare Figure 25 to Figure 24 and locate, within the raw alert JSON, the monitorCondition attribute under the data and essentials section names (the value is “Fired”).
You can specify the expression “triggerBody()?[‘data’]?[‘essentials’]?[‘monitorCondition’]” in any subsequent Logic app task configuration and the string “Fired” will be returned.
Technique #2 – Filtering JSON by accessing elements within an array based on their index values
Other important values you may need to access in an alert’s JSON dump may reside in arrays, rather than string values, and these are more difficult to work with in Logic app expressions. You can sometimes get around this by substituting the numeric sequence of the attribute of interest as an index number in place of a section name.
As an example of this technique, examine how we extract the configID, which is an inventory control number assigned to a computer in the ITSM, from the HTTP REST API query requesting that data. In the solution, the Logic app step HTTP – Get computer configID from ITSM returns data from the ITSM that is parsed by the task Parse JSON – ITSM ConfigurationItems.
This particular attribute (ConfigurationItems) is defined in the ITSM schema as an Array, that is, capable of returning a list of multiple items. Study Figure 26, which is the output of the Parse JSON – ITSM ConfigurationItems task. Notice the curly bracket “ { “ after the square bracket “ [ “. The square bracket means what follows is an array, and the curly bracket marks the beginning of the first array member.
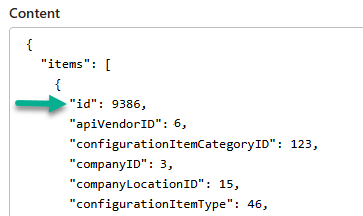
Figure 26 – JSON containing an array of multiple values, as opposed to just a string that is a single value.
We are interested in isolating the id inventory control number so we can store it as the variable configID. We provide that configID to the ITSM API when we create the ITSM ticket. Figure 27 shows the Set variable – configID task where we store the variable.
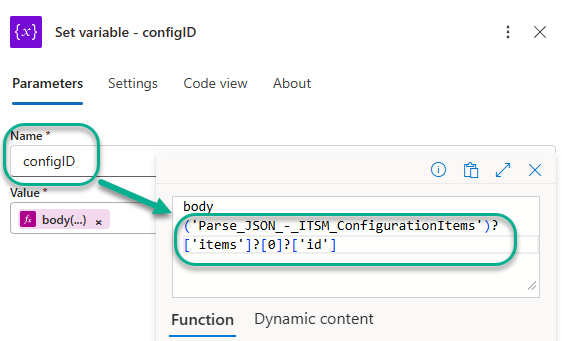
Figure 27 – Extracting specific array values using an index number in the expression.
The meaning of the expression body(‘Parse_JSON_-_ITSM_ConfigurationItems’)?[‘items’]?[0]?[‘id’] in the Set variable – configID task seen in Figure 27 is: From the body of the output of the ‘Parse_JSON_-_ITSM_ConfigurationItems’ task, in the ‘items’ section, select the first array in the sequence (index “0”), then select the value of attribute “id”. From Figure 26, we observe this value will be “9386”.
Technique #3 – Filtering JSON by using a series of Compose tasks
Still other times, neither the nested property nor the array index value methods will work to isolate the text string we need to supply to the ITSM system. In these cases, another technique involves a series of Compose tasks—each one performing one specific text manipulation task—the net effect of a chain of these being to arrive at the desired isolated value.
This technique can be seen in Figure 28, which we previously saw in Figures 20 and 25, which is the Logic app task that creates the ITSM ticket (the name of the task is HTTP – Create new ITSM ticket.) This time we are focusing on the Alert dimensions data which is the output of the Compose – Normalize dimensions 6 task.
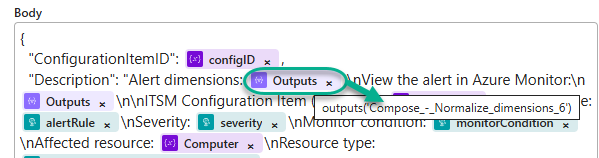
Figure 28 – A value in the Body of a REST API POST task, provided by the 6th Compose task in a chain of Compose tasks.
The Alert dimensions section is important and interesting from a monitoring perspective. Azure Monitor Alert dimensions exist for log search alerts (not metric or platform alerts) and provide details on the monitored instance (i.e. Computer name) and optionally the contained object (like a Drive Letter) that raised the specific alert. Learn more about alert dimensions at this link.
Figure 29 highlights what the Dimensions array looks like nested in the alertContext section of the raw Azure Monitor alert. This alert is for Computer Low Data Disk Space and the dimensions include the name of the computer and the drive letter with the low disk space.
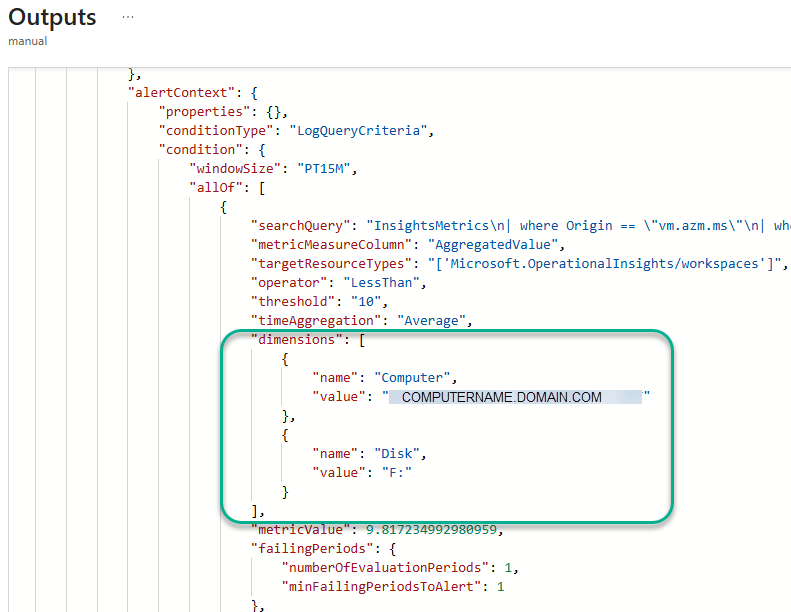
Figure 29 – Azure Monitor log alerts can optionally contain a dimensions array which is very useful to speed alert investigation.
Obviously, the details on a Low Disk alert regarding the server and the disk identity are mandatory for support personnel to start investigation and resolution of the issue. For this reason, a suggestion is to put the alert dimensions at the very top of the ITSM ticket body as seen in Figure 30.
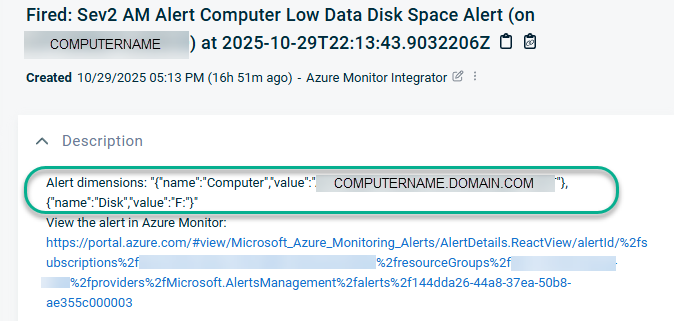
Figure 30 – The Azure Monitor alert Dimensions array, reformatted for the ITSM ticket.
To make the data we will include in the ITSM ticket readable and, as much as possible, devoid of JSON markup, we need to do some transformation–such that just the text strings we want in the ITSM ticket remain.
Because the dimensions array is nested inside an allOf array, I just wasn’t able to reliably extract the desired values using previously described methods #1 or #2. There may well be a much more elegant way to achieve the functional requirement. But the #3 method I’m about to describe worked for me, and really applies to any text transformation you want to do in an Azure Logic app.
Chaining Compose tasks for complex text transformations
This method relies on the Logic app Compose action. Compose actions consist of a single-line expression containing one or more String functions like replace and split. Using a chain of multiple compose tasks, each subsequent task taking the output of the previous task, the starting JSON input is ‘whittled away at’ by slicing text off–before and after our desired text–until only the desired text string remains.
Consider the set of eight (8) successive tasks in the Logic app, seen in Figure 31, which take place just before the ITSM ticket is created.
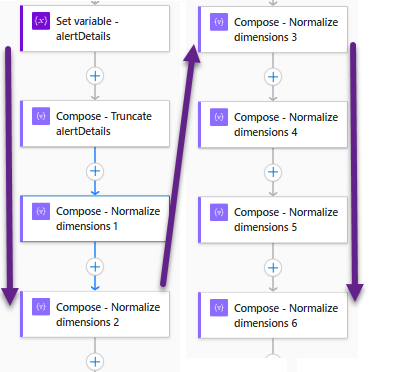
Figure 31 – Chained Compose tasks transform a large JSON array into a single desired text string.
The Compose action expression contained in each task, and an explanation of the results of each step is provided in Table 3.
| Logic app task name | Expression | Result |
| Set variable – alertDetails | triggerBody()?[‘data’]?[‘alertContext’] | Brings all the raw alertContext JSON array into the variable |
| Compose – Truncate alertDetails | first(split(variables(‘alertDetails’), ‘linkToSearchResultsUI’)) | Drops the text after a certain text string |
| Compose – Normalize dimensions 1 | last(split(outputs(‘Compose_-_Truncate_alertDetails’),’dimensions’)) | Drops the text before a certain text string |
| Compose – Normalize dimensions 2 | first(split(outputs(‘Compose_-_Normalize_dimensions_1′),’metricValue’))} | Drops the text after a certain text string |
| Compose – Normalize dimensions 3 | replace(outputs(‘Compose_-_Normalize_dimensions_2’), ‘\’, ”) | Replaces undesired text string with a new text string |
| Compose – Normalize dimensions 4 | replace(outputs(‘Compose_-_Normalize_dimensions_3’), ‘:[‘, ”) | Strips out undesired text string if present (leading “:[“) |
| Compose – Normalize dimensions 5 | replace(outputs(‘Compose_-_Normalize_dimensions_4′),’],’,”) | Strips out undesired text string if present (trailing “],”) |
| Compose – Normalize dimensions 6 | replace(outputs(‘Compose_-_Normalize_dimensions_5′),’,”type”:null,”values”:null,”operator”:null’,”) | Strips out undesired text string if present in metric log alerts. |
Table 3 – Expressions and effects of the chained Compose tasks seen in Figure 31.
The output of the final Compose task Compose – Normalize dimensions 6 is exactly the format we want in the ITSM ticket, and you can see this happen in Figure 28. The output of the Compose – Normalize dimensions 6 task is what we put in the ITSM ticket with the label Alert dimensions. Some additional notes on Compose tasks:
- Parallel processing: The same chain of Compose tasks can parallel process multiple text string manipulation requirements. In the Logic app, both Log, Log Metric, and Metric Azure Monitor alert types are supported by the same set of Compose tasks. If the expression in a given Compose task doesn’t apply to that alert, that task has no effect due to no matching text found. Example: Chained Compose tasks 1 & 2 extract the correct item from one alert type, leaving a second alert type unchanged, while chained Compose tasks 3 & 4 extract the correct item from the second alert type.
- Escaping special characters: In Azure Logic apps, the backslash character (\) serves as an escape character, particularly when dealing with JSON strings and special characters within expressions. Commonly, you will need to escape double quotes, backslashes, and slashes as \”, \\, and \/. To escape a single quote, you use two (2) single quotes: ”.
12. For each of the Log Analytics, Azure Resource Graph, and Metric alert types, continue to customize the text transformation tasks of Logic app Azure-Monitor-Alert-ITSM-HTTP-API until ITSM tickets are correctly created and updated in all scenarios.
Azure Monitor alerts on servers are produced by Azure Monitor alert rules, and those alert rules fall into several categories that have slightly varying schemas. Make you test fire all the types of alerts you expect to encounter in production while customizing the Logic app.
The several places in the Logic app where text transformations are taking place are completely open to your revision and refactoring using whatever Logic app tasks and expressions work for you.
This is an iterative, trial and error process, repeated for each alert type. Every time the Logic app reports a failure, open the Run history and research why a particular step failed or didn’t produce the expected outcome. As you customize the Logic app to match your alerts and ITSM, the more steps will execute successfully—until the entire Logic app reports success and you validate in your ITSM system that tickets are being created to your satisfaction and that of your NOC operators.
At the end of this step, you should be getting 100% success on all the triggered Logic app runs, and all the corresponding tickets in the ITSM system should be of production quality. Make sure you understand and have validated all the key Logic app activities detailed in the Figure 13 flowchart. Recommend make sure all stakeholders have reviewed the ITSM ticket queue(s) and agree the ticket formats are acceptable for them.
13. Configure your ITSM to launch the webhook URL of the Logic app Azure-Monitor-Close-ITSM-HTTP-API for each Azure Monitor ticket that is marked completed in the ITSM.
Until now we have only been working with the Logic app that creates and updates ITSM tickets from the Azure Monitor side (Azure-Monitor-Alert-ITSM-HTTP-API). However, there exists the need for the ITSM to write back to Azure Monitor when the goal is to allow use of both the ITSM ticket and the Azure Monitor alert history.
For most companies managing their Azure Monitor alerts from their ITSM, the ITSM will be the source of truth between the two systems. However, it is convenient and a best practice to have a degree of bi-directionality regarding synchronization of alert status between Azure Monitor and the ITSM. The reverse direction communication is handled by the Logic app Azure-Monitor-Close-ITSM-HTTP-API.
Reviewing the workflow of this Logic app in Figure 15, observe the Logic app has one purpose—to change the user response of the Azure Monitor alert to Closed when the ticket is completed in the ITSM, and to record the ITSM ticket number, timestamp, and other audit data in the body of the closed alert history.
If the alert is already in Closed status, the status is temporarily flipped back to Acknowledged so that the alert can be re-closed with the ITSM ticket audit trail in the comment history. See this workflow in Figure 32.
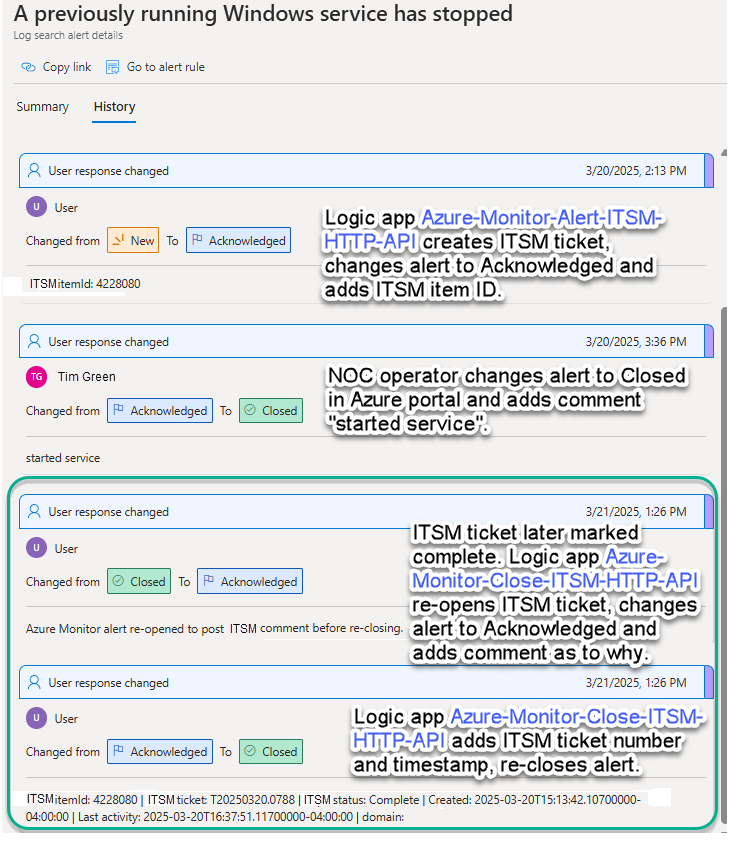
Figure 32 – Azure Monitor alert history is synchronized with ITSM ticket status.
Metric-based alerts and Log-based alerts have different alert closing protocols
Consider that alerts sourced from log-based queries won’t have an automatic resolution like metric-based queries which do have a threshold that can automatically change alerts to Resolved status. Put another way:
- Metric-based and Log alerts using metrics will progress to Resolved status, prompting Logic app Azure-Monitor-Alert-ITSM-HTTP-API to mark the ITSM ticket as completed, which triggers Logic app Azure-Monitor-Close-ITSM-HTTP-API to make a return connection to Azure and write the ITSM ticket receipt data to the Azure Monitor alert history.
- Log-based alerts of logged events will never progress to Resolved status and do require the ITSM ticket to be completed by NOC operators or ITSM automation. In this case Logic app Azure-Monitor-Close-ITSM-HTTP-API updates the ITSM ticket receipt data in the Azure Monitor alert history and closes the Azure Monitor alert in all cases.
Staging Azure-Monitor-Close-ITSM-HTTP-API to be invoked by the ITSM
Every major ITSM has the capability to launch a webhook when tickets are marked completed by NOC staff or NOC automation. The name of the feature varies by the ITSM product, but is probably known by one of these names: Business rule, One-Step Action, Extension callout, Integration webhook, Workflow Post Function, and/or Workflow Automation.
You will need to provide to your ITSM administrator the webhook destination of the Logic app. Find this URL at the Overview -> Essentials -> Workflow URL in the Logic app Azure-Monitor-Close-ITSM-HTTP-API as seen in Figure 33.
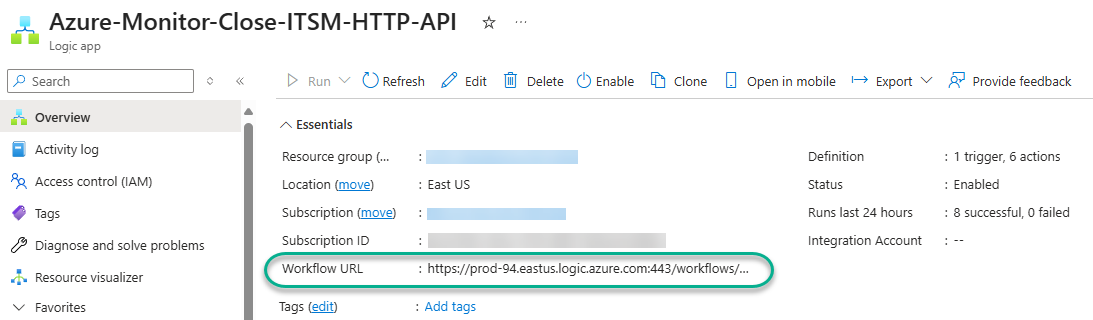
Figure 33 – Obtaining the webhook destination for the Azure-Monitor-Close-ITSM-HTTP-API Logic app to provide to the ITSM admin.
An automated workflow in the ITSM should be staged to perform a POST action in the XML-RPC data format to the Workflow URL whenever an Azure Monitor-sourced alert is completed in the ITSM. The ticket user-defined field in the solution is AMAlertID (the Azure monitor Alert ID.)
The default configuration of the consumption Logic apps in this solution does allow any Internet IP to initiate a webhook call if an unauthorized person learned the exact Workflow URL of your Logic app. If this is not satisfactory, you have several options to restrict this access. If you can define which ITSM public IPs will be calling the webhook URL, you can enter those IPs in the Allowed inbound IP addresses -> Trigger IP Addresses list of the Access Control Configuration of the Logic app Azure-Monitor-Close-ITSM-HTTP-API as seen in Figure 34.
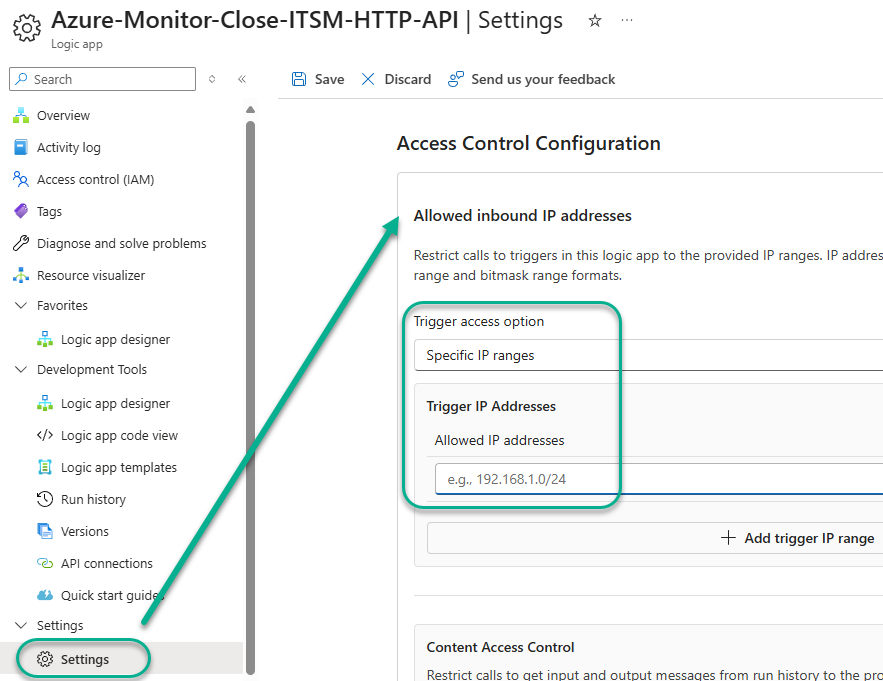
Figure 34 – Adding inbound IP addresses allowed to invoke the Azure Logic app Azure-Monitor-Close-ITSM-HTTP-API.
Note: To comply with a zero-trust model, the Access Control Configuration Allowed inbound IP address settings are enabled by default with arbitrary sample data. Customize the Access Control Configuration of both Logic apps so you can begin to test them.
If the configuration of your ITSM does not allow for isolation of specific allowed IP addresses, and if allowing all Internet IPs is unacceptable, you may find other options at this link. There are additional network security options available if you migrate the Consumption plan Logic app to a Standard plan Logic app. Sophisticated options might include employing an X-Hook Signature hash-based message authentication code (HMAC) and an Azure Function app to handle the signing key and logic.
14. Enable Secure inputs and outputs for the Key vault tasks in the Logic app Azure-Monitor-Alert-ITSM-HTTP-API.
To properly secure the Logic app’s handling of the secrets stored in Key vault, modify the security of the six (6) Get secret tasks in the Logic app Azure-Monitor-Alert-ITSM-HTTP-API. During development and testing, the key vault tasks are not secured, to allow you to view and debug the ITSM ticket-creation and updating steps. However, once development is complete and you move into production, securing the Key vault tasks will mask the secret values from execution histories, preserving confidentiality.
Locate each of the Get secret tasks and on the Settings tab, change the Security -> Secure inputs and Secure outputs to On as shown in Figure 35.
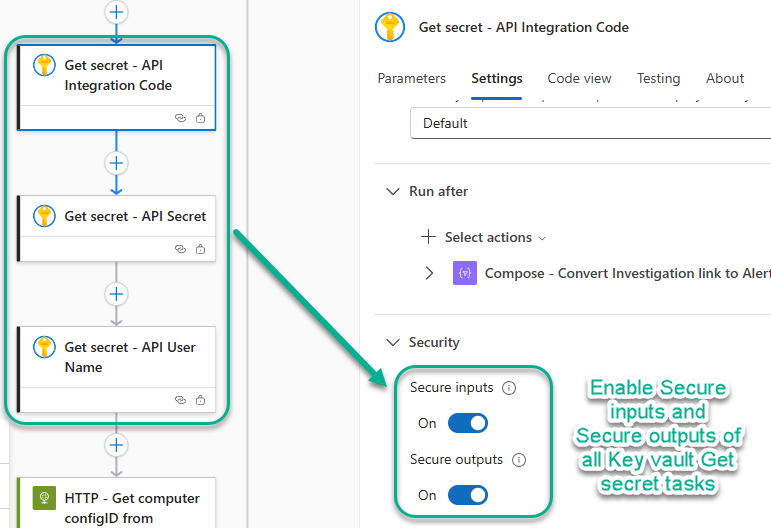
Figure 35 – Enable Secure inputs and Secure outputs in the Security Settings of all Key vault Get secret tasks.
After you enable Secure inputs and Secure outputs in the Key vault tasks, both the Key vault tasks and subsequent tasks containing secured Key vault inputs (like the task that creates the ITSM ticket) are masked as seen in Figure 36.
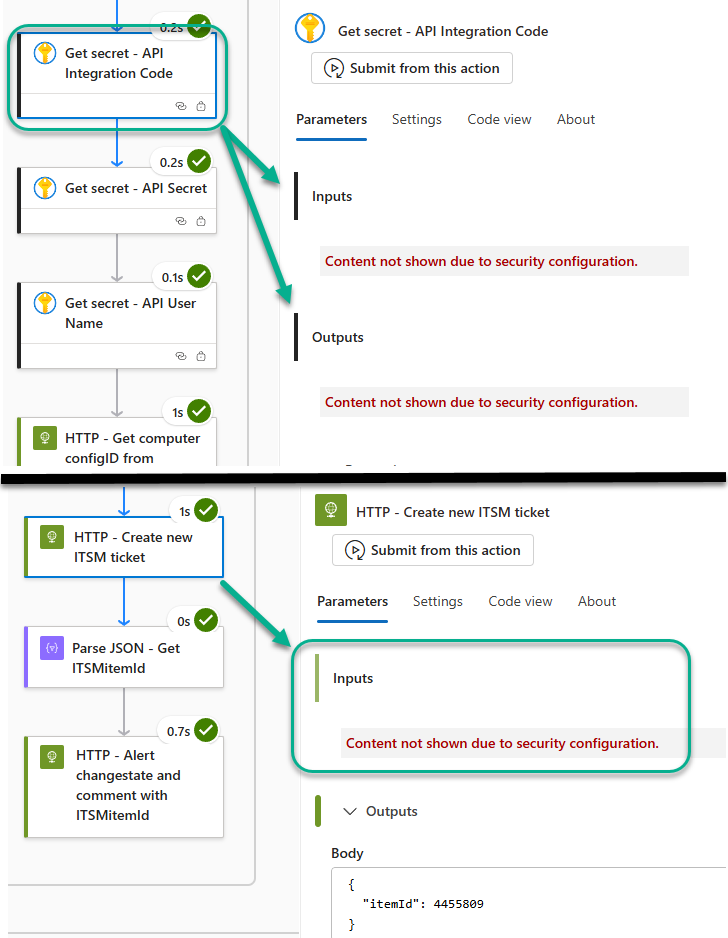
Figure 36 – With Key vault tasks secured, all Logic app tasks involving secrets from Key vault are masked.
Finally, change the secret in the ITSM and update the secret value in the Key vault. If you don’t do this, the Logic app run history developed during Logic app customization and testing will contain the plain-text secret of the (still-valid) ITSM API even after you secure the Logic app task executions from viewing by enabling Secure inputs and Secure outputs.
Now enjoy the fruits of your work and that of your team. Figure 37 illustrates what your ITSM ticket view might look like when fully integrated with Azure Monitor in your environment.
Figure 37 – Azure Monitor alerts viewed in the ITSM completed ticket queue: Azure Monitor tightly integrated with your ITSM.
#MVPBuzz #AzureMonitor #ITSM #Observability #Azure #Cloudcomputingt