
Microsoft System Center Operations Manager (MOM and SCOM) administrators have for almost two decades needed to manage up to four (4) domain service accounts requiring passwords. A feature called Group Managed Service Accounts (gMSA) introduced in Windows Server 2012 is now supported by SCOM 2019 with its latest update (UR1). Converting existing SCOM 2019 instances to using gMSA will free you from service account password management with significant security and administration benefits.
SCOM Service Accounts
When installing SCOM, it is necessary to specify the username and password for various accounts that either run Windows services or are used to launch processes on one or more servers. These are the four well-known SCOM service accounts that exist in almost all SCOM installations worldwide:
- Management Server Action Account (MSAA)
- Data Access Server account (DAS or SDK)
- Data Warehouse Write Account (DWWA)
- Data Reader Account (DRA)
A few of these, particularly the MSAA and DAS/SDK are powerful administrator accounts requiring due diligence to keep highly sensitive credentials secret. Periodically changing service account passwords is a security best practice that has been time consuming and cumbersome to effect with SCOM.
Introducing Group Managed Service Account (gMSA) Support
To use gMSAs on your network, you need to update your Active Directory (AD) forest to Windows Server 2012 or later functionality level. gMSA passwords are generated randomly and stored in AD. The password is complex and contains 120 characters. gMSA passwords are automatically changed every month much like domain computer account passwords. That’s much better security than most anyone’s SCOM has ever enjoyed and it’s all hands-off! To learn more read Getting Started with Group Managed Service Accounts.
gMSAs are created using the New-ADServiceAccount PowerShell cmdlet, they can’t be created with the AD Users and Computers snap-in. When you create a gMSA, an object of type ms-DS-Group-Managed-Service-Account is created in AD. You can view your gMSAs in AD Users and Computer snap-in with View Advanced Features enabled. Figure 1 shows the four corresponding gMSAs you will create to migrate your SCOM 2019 UR1 instance(s)–From using legacy password-based user accounts to using new gMSA accounts. Observe also the managed password attributes that exist in a gMSA AD object.
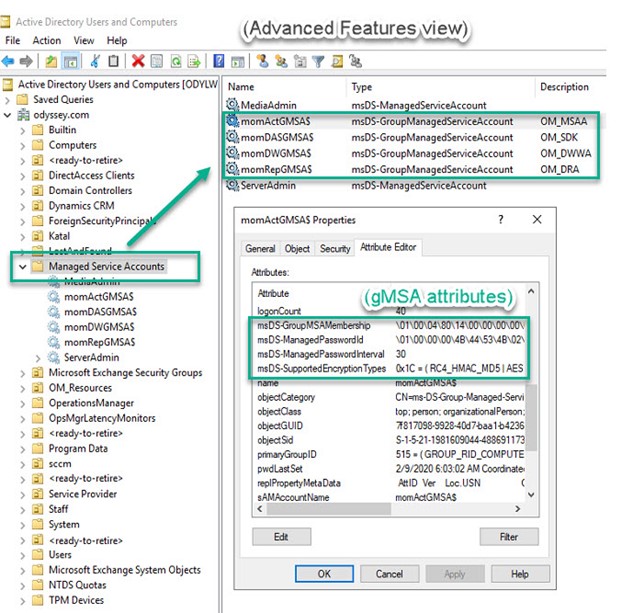
Figure 1 – Viewing gMSA accounts in ADU&C after creating them with PowerShell.
SCOM 2019 and UR1
If you are a System Center organization, and your organization has not upgraded SCOM to the current 2019 version, this is a good reason to consider making that upgrade now. Then you can apply Update Rollup 1 to SCOM 2019 which adds support for gMSAs as SCOM service accounts. Use of gMSAs with SCOM is only possible when a SCOM 2019 instance is updated to SCOM 2019 UR1. It is not possible at this time to install a new SCOM instance with gMSAs, but rather you must install SCOM 2019 with legacy user service accounts, then update SCOM 2019 to UR1 and replace the service accounts with gMSA equivalents.
SCOM admins should seek to deploy the gMSA feature to significantly reduce the administrative burden of managing SCOM service account passwords. Using the gMSA model also reduces the attack surface of the SCOM platform by eliminating the vector of compromised legacy service account user passwords. Adding gMSA support to SCOM has been a highly requested feature in the SCOM user feedback forum that was marked closed with the release of SCOM 2019 UR1.
SCOM 2019 UR1 includes another new feature: Simplified management server update with integrated SQL database updates and management pack updates. Figure 2 is a screenshot of the new update experience. Microsoft’s premier SCOM engineer Kevin Holman has published his highly regarded UR1 for SCOM 2019 – Step by Step. Use that guide from Kevin to install UR1 for SCOM 2019. The rest of this article starts from the point after UR1 has been successfully deployed to your SCOM 2019 management group.
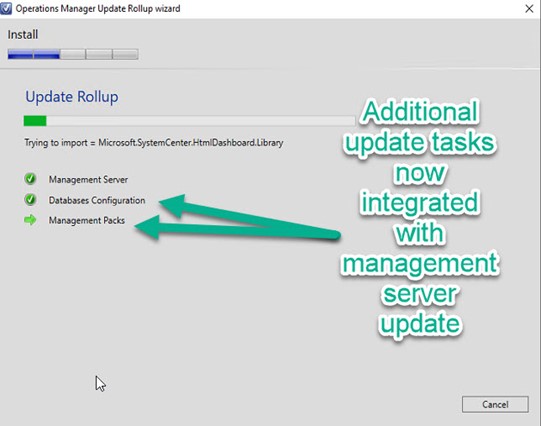
Figure 2 – Database configuration and Management pack operations were previously separate, manual steps.
Deploying the gMSA solution for SCOM 2019 UR1
The official documentation for Support for group managed service accounts contains the steps you need to follow to migrate an existing SCOM 2019 UR1 instance using legacy username/password service accounts to using gMSAs for service accounts. The rest of this article will walk through each of these steps. Before executing these steps, consider:
- Groom your SCOM 2019 UR1 instance for noise in the Operations Manager event log. If you encounter errors induced by changing accounts and permissions, it’s important to identify new sources of issues in order to correlate them with involved changes. Clean up or and/or clearly recognize existing “red” generating event log entries so you can spot new ones the gMSA changes may introduce.
- Perform full server and database backups before implementing changes. Changes may unexpectantly introduce too many errors to troubleshoot and reversion to a previous known good state is the best recovery plan.
- This procedure has only been validated on a single server (all-in-one) SCOM configuration with co-resident, dedicated SQL Server and SQL Server Reporting Server instances. If you have a distributed multi-server environment, additional testing and validation will be required.
1. Create gMSA accounts
As mentioned, gMSA accounts are created with PowerShell. Consult Getting Started with Group Managed Service Accounts for details on creating gMSAs. For my demonstration domain ‘odyssey.com’ and management server HYDRA$, these lines of PowerShell created the necessary accounts:
New-ADServiceAccount momActGMSA$ -DNSHostName momActGMSX$.odyssey.com -PrincipalsAllowedToRetrieveManagedPassword HYDRA$ -KerberosEncryptionType RC4, AES128, AES256
New-ADServiceAccount momDASGMSA$ -DNSHostName momDASGMSA$.odyssey.com -PrincipalsAllowedToRetrieveManagedPassword HYDRA$ -KerberosEncryptionType RC4, AES128, AES256
New-ADServiceAccount momDWGMSA$ -DNSHostName momDWGMSA$.odyssey.com -PrincipalsAllowedToRetrieveManagedPassword HYDRA$ -KerberosEncryptionType RC4, AES128, AES256
New-ADServiceAccount momRepGMSA$ -DNSHostName momRepGMSA$.odyssey.com -PrincipalsAllowedToRetrieveManagedPassword HYDRA$ -KerberosEncryptionType RC4, AES128, AES256
If you are creating the first gMSA in your domain, you might receive the error “Key does not exist” as shown in Figure 3. If this happens, run this line of PowerShell (procedure courtesy Trevor Sullivan):
Add-KdsRootKey –EffectiveTime ((get-date).addhours(-10));
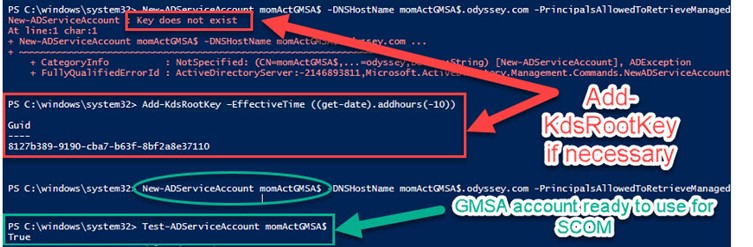
Figure 3 – Adding KDS root key if necessary before creating your first gMSA.
As you can see at the bottom of Figure 3, test each gMSA after creating it by running this command and looking for the “True” value:
Test-ADServiceAccount momActGMSA$
Test-ADServiceAccount momDASGMSA$
Test-ADServiceAccount momDWGMSA$
Test-ADServiceAccount momRepGMSA$
2. Add Security Rights to gMSA accounts
Immediately add the new gMSA versions of the Action Account and DAS/SDK account to the Local Administrators group of your management server.
Next, the domain gMSA accounts you created in the first step need to be added to Local Security Policy of the management server as follows:
-
Log on as a service (as shown in Figure 4)
- momActGMSA$ (the ‘new’ OM_MSAA)
- momDASGMSA$ (the ‘new’ OM_SDK)
- momDWGMSA$ (the ‘new’ OM_DWWA)
- momRepGMSA$ (the ‘new’ OM_DRA)
-
Log on as a batch right
- momDWGMSA$ (the ‘new’ OM_DWWA)
- momRepGMSA$ (the ‘new’ OM_DRA)
-
Generate security audits
- momDASGMSA$ (the ‘new’ OM_SDK)
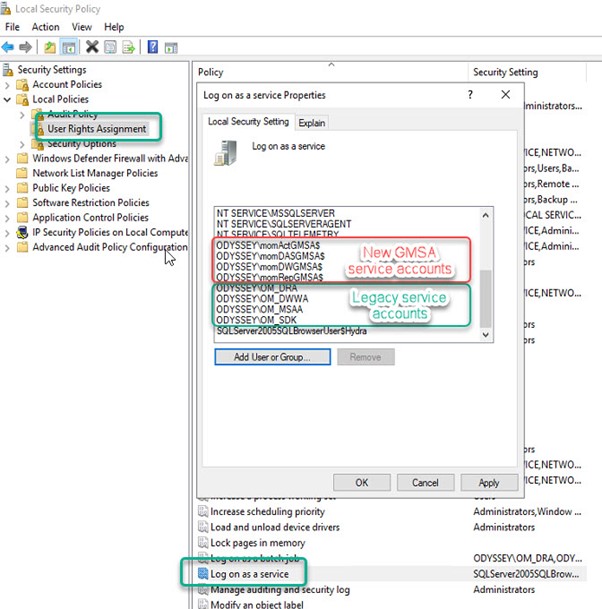
Figure 4 – Duplicate the User Rights Assignments held by the legacy service accounts for each of the new gMSA accounts.
3. Add gMSA accounts to SQL database security
This is the most time consuming step and you need to pay attention to detail that you make all the necessary changes correctly. Figure 5 shows where and how you add SQL database permissions for one account in one database (here the momActGMSA$ account’s permissions to the msdb system database):
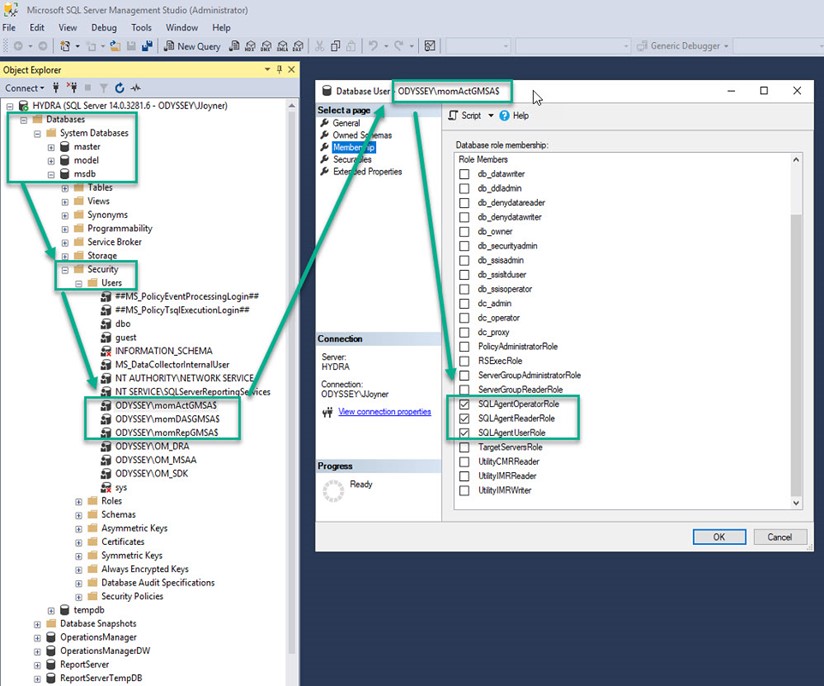
Figure 5 – Adding specific SQL security permissions for a given gMSA account and a given SQL database.
As you did with adding matching permissions to the local security policy, you will now add matching SQL database permissions using SQL Server Management Studio for each gMSA according to Table 1:
|
gMSA Service Account |
Database |
Roles |
|
momActGMSA$ |
msdb |
SQLAgentOperatorRole SQLAgentReaderRole SQLAgentUserRole |
|
momActGMSA$ |
OperationsManager |
db_datareader db_datawriter db_ddladmin dbmodule_users |
|
momDASGMSA$ |
msdb |
SQLAgentOperatorRole SQLAgentReaderRole SQLAgentUserRole |
|
momDASGMSA$ |
OperationsManager |
configsvc_users db_accessadmin db_datareader db_datawriter db_ddladmin db_securityadmin dbmodule_users sdk_users sql_dependency_subscriber |
|
momDASGMSA$ |
OperationsManagerDW |
apm_datareader db_datareader OpsMgrReader |
|
momDWGMSA$ |
OperationsManager |
apm_datareader apm_datawriter db_datareader dwsynch_users |
|
momDWGMSA$ |
OperationsManagerDW |
apm_datareader db_datareader db_owner OpsMgrWriter |
|
momRepGMSA$ |
master |
RSExecRole |
|
momRepGMSA$ |
msdb |
RSExecRole SQLAgentOperatorRole SQLAgentReaderRole SQLAgentUserRole |
|
momRepGMSA$ |
OperationsManagerDW |
apm_datareader db_datareader OpsMgrReader |
|
momRepGMSA$ |
ReportServer |
db_owner RSExecRole |
|
momRepGMSA$ |
ReportServerTemp |
db_owner RSExecRole |
Table 1 – SQL database permissions to add for each new gMSA account.
Additionally, and although I didn’t find this step in Microsoft documentation, I found it was necessary to avoid error messages. Add the new Data Warehouse Write Account and Data Reader accounts (momDWGMSA$ and momRepGMSA$) to the Operations Manager Report Security Administrators User Role in the SCOM Console -> Administration -> Security -> User Roles as shown in Figure 6.
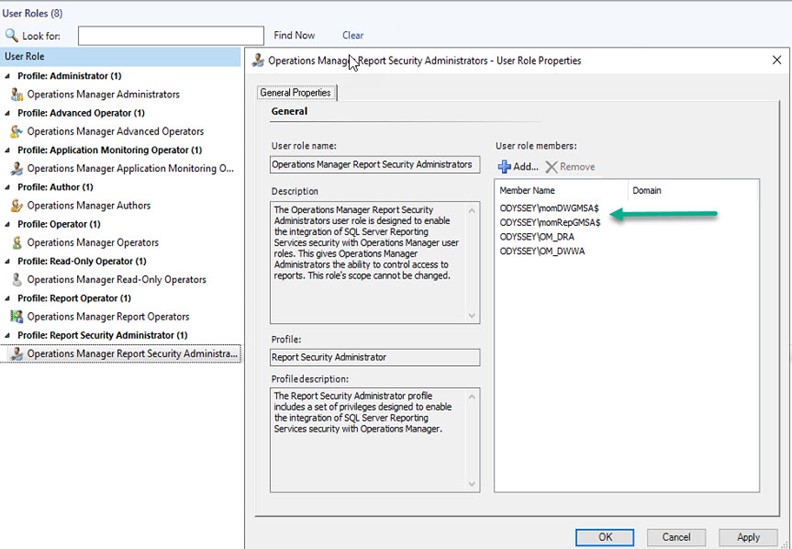
Figure 6 – Matching the Report Security User Role Properties of the new gMSA accounts to those of the existing legacy service accounts.
4. Service level changes
Up until now, no changes have affected the operation of your SCOM management group. Beginning with these steps, you will actually shift SCOM workflow from the old to the new service accounts. Make sure you have a good backup of your SCOM environment before performing these service level changes. Consider making one change at a time and assessing impact rather than performing all the changes at once. Follow the detailed steps at this link to perform these tasks:
- Change service account for System Center Data Access Service to gMSA using Windows Services MMC.
- Change the credentials for System Center Configuration Service using Windows Services MMC.
-
Change service account for SQL Server Reporting Services to gMSA using Windows Services MMC, then using Reporting Service Configuration Manager.
- Note: SQL Server doesn’t support gMSA for SSRS Execution account. Continue to use non-gMSA account for this account (OM_DRA in our example).
- Change the Data Warehouse Write account to use gMSA in the SCOM Console -> Administration -> Run As Configuration -> Accounts -> Type: Windows.
- Update the Data Warehouse database using a SQL Query executed against the OperationsManagerDW database.
5. Console level changes
A final short step is to change the credential of the Default Action account at SCOM Console -> Administration -> Run As Configuration -> Accounts -> Type: Action Account from the legacy OM_MSAA account to the new momActGMSA$ account as shown at this link. In my experience, this also properly changed the Default Action account run as profile, but you may want to double-check at Run As Configuration -> Profiles -> Default Action Account that your new gMSA Action Account is active on your SCOM management server(s) as shown in Figure 7:
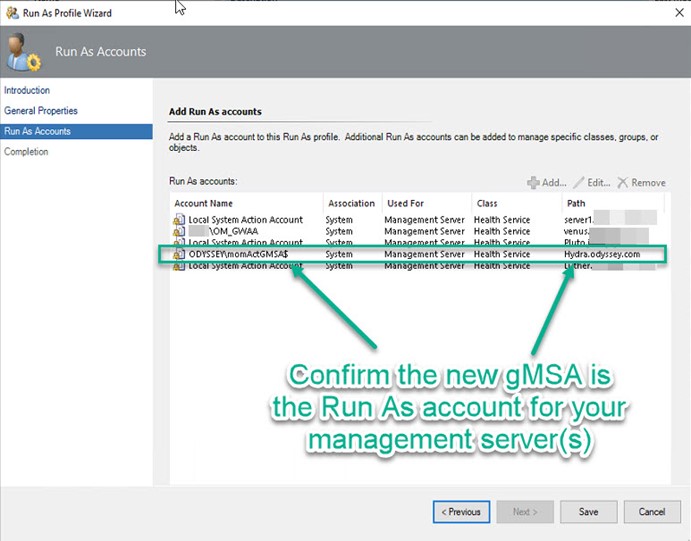
Figure 7 – After changing the Action Account, verify the Run As account is properly assigned to the new gMSA account.
Note when working with gMSAs in the SCOM console, no password is entered. After SCOM 2019 is updated to UR1, SCOM is aware that if you type a service account name ending with “$” that it is a gMSA and no password is expected. To push the SCOM agent from the SCOM console using a gMSA as a specified action account credential, just leave the password field blank and push Next.
This completes the procedures to adopt Group Managed Service Accounts into your System Center Operations Manager environment. Congratulations, you have significantly increased the security and the administrative usability of your System Center installation.
Tags: #MVPBuzz #sysctr #SCOM #HybridCloud #cloudSecurity #securityManagement #networkSecurity
10 thoughts on “SCOM Service Account Password Freedom at Last”
Excellent article!
but when I do a test with the command: Test-ADServiceAccount svc.scomActGMSA $ I have the following warning.
WARNING: Test failed for Managed Service Account svc.scomActGMSA$. If standalone Managed Service Account, the account
is linked to another computer object in the Active Directory. If group Managed Service Account, either this computer
does not have permission to use the group MSA or this computer does not support all the Kerberos encryption types
required for the gMSA. See the MSA operational log for more information.
Is there any configuration to do?
Thanks Rodrigo! 🙂 I am not aware of any configuration to do. Can I ask if you received any output or errors when running New-ADServiceAccount svc.scomActGMSA$ ?
Did you also add the Data Reader Account to Data Warehouse Report Deployment Account? This isnt in the doco either but seems logical…
ah I see the Data Warehouse Report Deployment Account maps to the SSRS Execution Account which cannot change. That makes sense.
Indeed Christian it’s one part that can’t change yet.
Thanks for the feedback always,
John
Needed to create you this very little remark to finally
thank you the moment again regarding the magnificent guidelines you have provided
in this article. It was certainly tremendously generous of you to provide
openly what exactly numerous people might have supplied as an e-book
in making some money for themselves, certainly considering the fact that you could have done it if you considered necessary.
These tactics also worked as the fantastic way to understand that other people
online have the identical eagerness much like my very own to learn a little more concerning this issue.
I believe there are a lot more pleasant situations up
front for individuals that read carefully your website.
Things have changed it would appear since these instructions were provided. I am not able to do some of these steps running UR3. I am not able to change the RunAs accounts to gMSA as the console will complain that the password is blank. I am not able to add gMSA account to the User Roles Operations Manager Report Security Administrator because Service Accounts is not an option, only Users or Groups… And before you say change object types, that doesn’t work because as stated… Only Users or Groups are options. I am unable to change the username/password of the default action account because, SCOM keeps changing it back to what it was prior by creating a new default user account with the old information… As with working with many Microsoft solutions… frustrating…
Hi Nathan,
Thanks for sharing your issue, can you let me know if information at this link is helpful?
https://docs.microsoft.com/en-us/answers/questions/484391/scom-2019-integrated-ur3-install-media-gmsa-proble.html
-John
Hi Nathan,
Thank you very much for this write-up. I was looking at the Database permissions that you wrote up for each account and I was comparing it to the microsoft documentation and I see there are differences. Are you just including additional permissions or is Microsoft missing permissions?
Thanks!
Hi Nathan, I do notice there are a few differences between the article and the current on-line docs:
https://learn.microsoft.com/en-us/system-center/scom/database-changes
It’s certainly possible there have been changes since I wrote the article for SCOM 2019 and in the SCOM 2022 version. Please use what is found at the website.