
Two pillars of the Microsoft security solution are Microsoft Defender for Cloud (threat, vulnerability, and compliance management) and Microsoft Sentinel (SIEM and SOAR). Both products include an architecture where servers and services to be monitored, called ‘workloads’, are connected to the respective cloud security services for protection. It’s important that all workloads in your estate are protected by both Microsoft Defender for Cloud and Microsoft Sentinel. To ensure desired workload protections are enabled and stay that way, this article describes leveraging two (2) Azure policy initiatives to error-proof and automate all applicable workload protections to both Microsoft Defender for Cloud and Microsoft Sentinel.
Effective security: ‘Eyes on’ the workloads
Microsoft’s flagship security products are organized around the workloads they protect. Each service (Microsoft Defender for Cloud and Microsoft Sentinel) has a different selection of protectable workloads, with some overlap—and each service has their own mechanism to extend security protection to those workloads. However, connection of workloads to both services can be managed uniformly with Azure policy. A primary use case for Azure Policy is to implement governance for resource consistency, regulatory compliance, security and auditing, cost, and uniformity of management tooling.
Figure 1 illustrates how the tasks of protecting ten (10) classes of workloads with Defender for Cloud, and connecting five (5) Azure service workloads to Microsoft Sentinel, can be consolidated into two (2) Azure policy initiatives. This article describes step-by-step how the policy initiatives are created, assigned, and could be used for effective and ongoing security management.
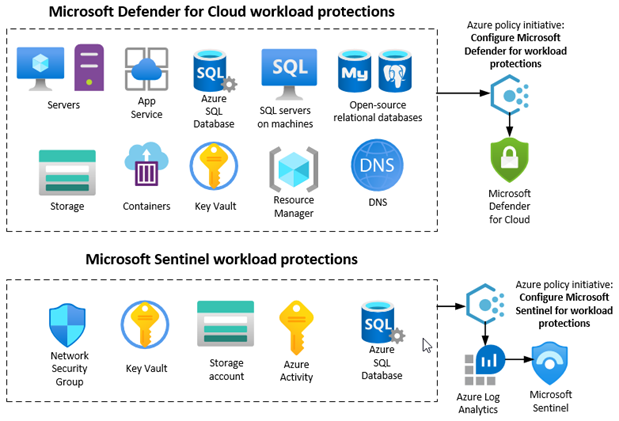
Figure 1 – Two Azure policy initiatives can connect all workloads with security solutions to their respective services.
Microsoft Defender for Cloud workload protections
Microsoft Defender for Cloud is a tool for security posture management and threat protection. It strengthens the security posture of your cloud resources, and with its integrated Microsoft Defender plans, Microsoft Defender for Cloud protects workloads running in Azure, hybrid, and other cloud platforms. To enable all Microsoft Defender for Cloud features including threat protection capabilities, you must enable enhanced security features on the subscription containing the applicable workloads. Figure 2 shows off the ‘one big button’ approach to turning on protection for all resources in an Azure subscription from the Environment settings blade of Microsoft Defender for Cloud. Clicking the blue box on the right and pushing the Save button will enable Defender for Cloud on all protectable workloads in the one subscription.
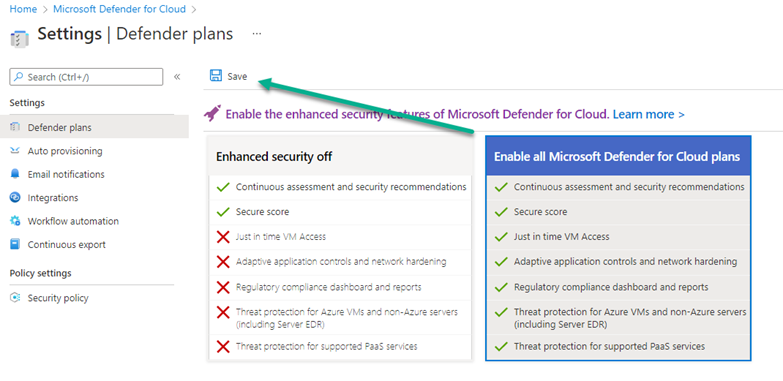
Figure 2 – Enabling Defender for Cloud on one subscription from the Environment settings blade of Defender for Cloud.
Using the Microsoft Defender for Cloud -> Environment settings -> Defender plans blade (seen in Figure 2) in the Azure portal is not the only way to enable Defender for Cloud workload protection. Workload protections can also be enabled programmatically by Azure Policy. If you are responsible for the security of multiple Azure subscriptions, and/or you want to uniformly deploy Azure policy in your environment for governance and assurance purposes, consider using policy to enable and enforce workload connection to Microsoft Defender for Cloud.
Step-by-step: Azure policy initiative for Microsoft Defender for Cloud workload protections
-
Navigate in the Azure portal to Policy -> Authoring -> Definitions and type Defender in the Search box.
Locate the policies and initiatives highlighted in Figure 3. (You’ll be adding these policies to a custom Initiative we make in the next step.)
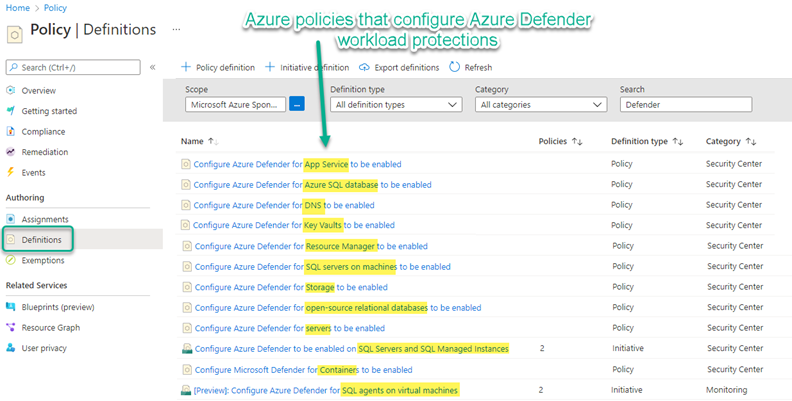
Figure 3 – Locating Azure policy definitions that configure Defender for Cloud workload protections.
-
Push the + Initiative definition button and author a new custom Initiative:
- Name: Configure Azure Defender for workload protections
- Description: Enable Microsoft Defender for Cloud’s enhanced security features on all the resource types in your subscription(s).
- Category: (Use existing) Security Center
-
Version: 1.0.0
-
Push the Next button and then the Add policy definition(s) button.
- Type Configure Azure Defender in the search bar.
-
Select each of the policies as shown in Figure 4 and push Add.
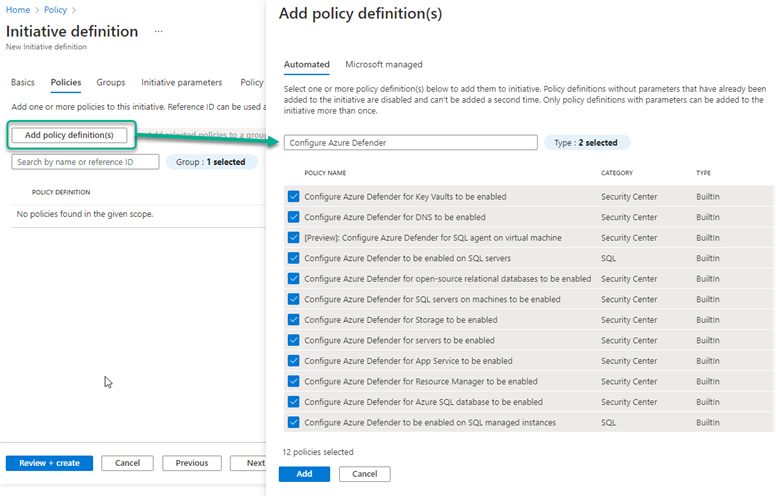
Figure 4 – Selecting the built-in policies that configure Microsoft Defender for Cloud on workloads.
- From the Initiative definition -> Policies tab, push the Add policy definition(s) button again.
- Type Microsoft Defender in the search bar and select the Configure Microsoft Defender for Containers to be enabled policy and push Add.
- From the Initiative definition -> Policies tab, push the Add policy definition(s) button again.
- Type SQL agent in the search bar and select the [Preview]: Configure Azure Defender for SQL agent on virtual machine policy and push Add. (You add two instances of this policy to the initiative, this is the second instance.)
-
Push Next a few times and on the Policy parameters tab:
- For Reference ID “[Preview]: Configure Azure Defender for SQL agent on virtual machine_1” select the value AdvancedThreatProtection.Windows
- For Reference ID “[Preview]: Configure Azure Defender for SQL agent on virtual machine_2” select the value VulnerabilityAssessment.Windows
- Push Review + Create. Confirm you have 14 policies in the initiative as seen in Table 1, then push Create.
|
Policies in ‘Configure Azure Defender for workload protections’ Initiative |
|
Configure Azure Defender for App Service to be enabled |
|
Configure Azure Defender for Azure SQL database to be enabled |
|
Configure Azure Defender for DNS to be enabled |
|
Configure Azure Defender for Key Vaults to be enabled |
|
Configure Azure Defender for Resource Manager to be enabled |
|
Configure Azure Defender for SQL servers on machines to be enabled |
|
Configure Azure Defender for Storage to be enabled |
|
Configure Azure Defender for open-source relational databases to be enabled |
|
Configure Azure Defender for servers to be enabled |
|
Configure Azure Defender to be enabled on SQL servers |
|
Configure Azure Defender to be enabled on SQL managed instances |
|
Configure Microsoft Defender for Containers to be enabled |
|
[Preview]: Configure Azure Defender for SQL agent on virtual machine (ASC_DeployAzureDefenderForSqlAdvancedThreatProtectionWindowsAgent) |
|
[Preview]: Configure Azure Defender for SQL agent on virtual machine (ASC_DeployAzureDefenderForSqlVulnerabilityAssessmentWindowsAgent) |
Table 1 – List of policies to include in custom Initiative “Configure Azure Defender for workload protection”.
-
Assign the custom Initiative you just created to your subscription:
- Navigate in the Azure portal to Policy -> Authoring -> Definitions and type Configure Azure Defender for workload protections in the Search box.
- Click on the initiative name and push the Assign button.
- Click the Next button a few times. On the Remediation tab verify the System assigned managed identity
location and note the Azure RBAC role permissions that will be granted to the identity: Contributor, Security Admin, and SQL Security Manager. Those roles empower the managed identity to use the respective polices that enable Microsoft Defender for Cloud protection on workloads. -
Push Review + Create, then push Create
-
Run remediation tasks against existing Azure workloads
(While new workloads created after the initiative is assigned will be automatically enabled for Microsoft Defender for Cloud, existing workloads require an Azure Policy remediation task to be launched in order to get the right settings.)
- Wait a few hours after you have assigned the initiative to allow Azure Resource Manager (ARM) to analyze existing workloads for compliance.
- Navigate in the Azure portal to Policy -> Compliance -> Definitions and click on the Configure Azure Defender for workload protections assignment.
- Click on the Non-compliant resources tab to see if you need to launch any remediation tasks. If any non-compliant resources are listed, push the Create Remediation Task button.
-
For each of the fourteen (14) policies:
- Select the policy in the Policy to remediate drop-down box.
- If there are resources needing that remediation, their names will appear at the lower part of the page. (If you have no resources of the type for that policy needing remediation, no resource names appear.)
- Push the Remediate button.
-
Repeat these steps for each of the remaining policies–that is, select the next policy from the Policy to remediate drop-down box and see if there are non-compliant resources to remediate.
-
Observe that you have achieved 100% compliance for the policy initiative as seen in Figure 5. Congratulations on securing your Microsoft Defender for Cloud workload protections using a consolidated Azure Policy!
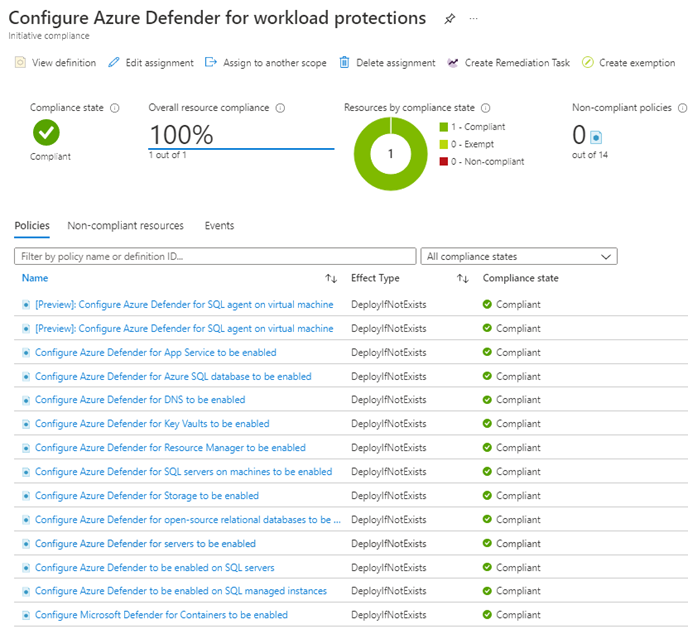
Figure 5 – Successful assignment of all Azure policies to connect workloads to Microsoft Defender for Cloud.
-
If you return in the Azure portal to the Microsoft Defender for Cloud -> Management -> Environment settings page, you will observe that all the Microsoft Defender plans are “On” as seen in Figure 6.
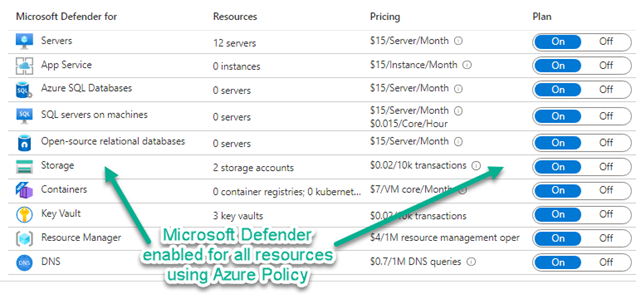
Figure 6 – All Microsoft Defender for Cloud workload protections enabled by Azure Policy.
-
You can spot-verify one or more workload protections by navigating to the Security menu item of an in-scope workload. For example, Figure 7 shows Microsoft Defender for Storage enabled on a storage account.
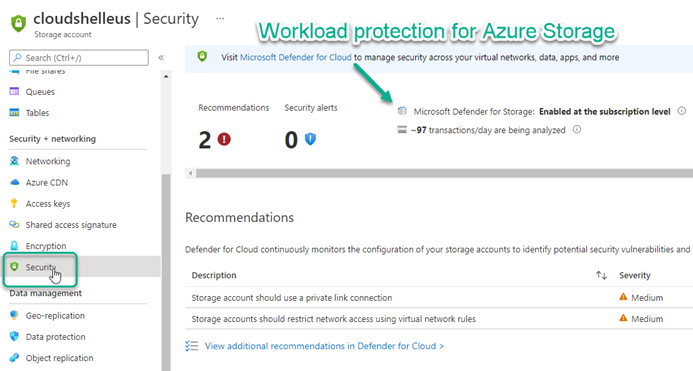
Figure 7 – Each workload protected by Microsoft Defender for Cloud has its own Security page where you can verify coverage and observe protection products like Recommendations and Security incidents and alerts.
- If you have other subscriptions to enable for Microsoft Defender for Cloud, consult this link for options to assign the initiative to other scopes at the subscription or the management group levels:
Microsoft Sentinel workload connections
Microsoft Sentinel is a scalable, cloud-native, security information and event management (SIEM) and security orchestration, automation, and response (SOAR) solution. Microsoft Sentinel content is SIEM content that enables you to ingest data, monitor, alert, hunt, investigate, respond, and connect with different products, platforms, and services in Microsoft Sentinel.
The Data connectors page, accessible from the Microsoft Sentinel navigation menu, shows the full list of connectors that Microsoft Sentinel provides, and their status in your workspace. The normal method of enabling data connectors is selecting the connectors you want to connect, one at a time, and then pushing the Open connector page button as seen in Figure 8.
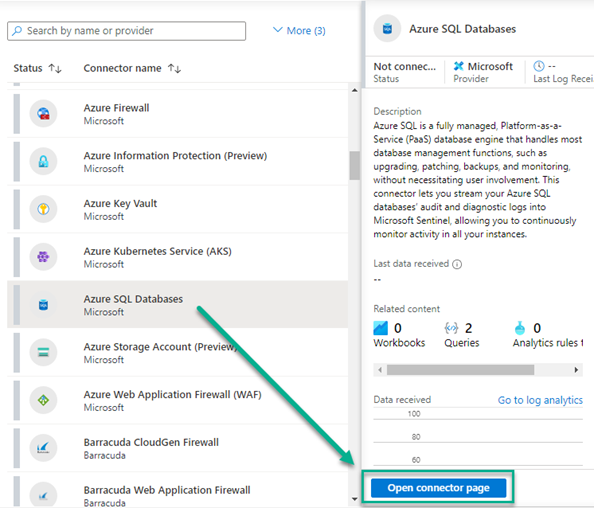
Figure 8 – Enabling Microsoft Sentinel data connectors for workloads using the Microsoft Sentinel navigation menu.
Using the Microsoft Sentinel -> Configuration -> Data connectors blade (seen in Figure 8) in the Azure portal is not the only way to enable Microsoft Sentinel workload protection. Workload protections can also be enabled programmatically by Azure Policy. If you are responsible for the security of multiple Azure subscriptions, and/or you want to uniformly deploy Azure policy in your environment for governance and assurance purposes, consider using policy to enable and enforce workload connection to Microsoft Sentinel.
|
Note: The best practice for connecting your Windows and Linux servers to Microsoft Sentinel–both in-Azure and, through Azure Arc, running in other locations such as VMware private clouds and other public clouds like AWS and GCP–is to assign the built-in Azure policy initiative Enable Azure Monitor for VMs to in-scope subscriptions. The custom policy initiative we are building performs a similar function, but for non-server workloads (like Key Vaults and SQL servers). I have written a previous blog article you can refer to for the step-by-step instructions to deploy the Azure Monitor initiative |
Step-by-step: Azure policy initiative for Microsoft Sentinel workload protections
-
Navigate in the Azure portal to Policy -> Authoring -> Definitions and type Enable Azure Monitor for VMs in the Search box.
-
Click on the name Enable Azure Monitor for VMs to open the Initiative Definition page for the built-in initiative. (You’ll be duplicating the built-in initiative to create a custom initiative, then adding and removing polices from the duplicated custom initiative.)
-
Push the Duplicate initiative button and author a new custom Initiative:
- Name: Configure Microsoft Sentinel for workload protections
- Description: Enable Microsoft Sentinel connections to data sources. Takes Log Analytics workspace as parameter.
- Category: (Use existing) Monitoring
-
Version: 1.0.0
-
Push the Next button and then the Add policy definition(s) button.
- Select and add the five (5) policies listed in Table 2 and push Add.
|
Policies in ‘Configure Microsoft Sentinel for workload protections’ Initiative |
|
Configure Azure Activity logs to stream to specified Log Analytics workspace |
|
Configure Azure SQL database servers diagnostic settings to Log Analytics workspace |
|
Configure diagnostic settings for Azure Network Security Groups to Log Analytics workspace |
|
Configure diagnostic settings for storage accounts to Log Analytics workspace |
|
Deploy Diagnostic Settings for Key Vault to Log Analytics workspace |
Table 2 – List of policies to include in custom Initiative “Configure Microsoft Sentinel for workload protections”.
- Remove each of the ten (10) pre-existing Azure Monitor policies from the initiative. Select a policy and push the “…” button in the right column and select Remove policy.
- Push Next a few times and on the Policy parameters tab, for all five (5) policies, set each Reference ID value to logAnalytics_1.
-
Push Review + Create. Confirm you have 5 policies in the initiative as seen in Table 2, then push Create.
-
Assign the custom Initiative you just created to your subscription:
- Navigate in the Azure portal to Policy -> Authoring -> Definitions and type Configure Microsoft Sentinel for workload protections in the Search box.
- Click on the initiative name and push the Assign button.
- Click the Next button. On the Parameters tab, select the Log Analytics workspace connected to Microsoft Sentinel. Then click Next.
- On the Remediation tab verify the System assigned managed identity
location and note the Azure RBAC role permissions that will be granted to the identity: Monitoring Contributor, Log Analytics Contributor, and SQL Security Manager. Those roles empower the managed identity to use the respective polices that enable Microsoft Sentinel connection to workloads. -
Push Review + Create, then push Create
-
Run remediation tasks against existing Azure workloads
(While new workloads created after the initiative is assigned will be automatically connected to Microsoft Sentinel, existing workloads require an Azure Policy remediation task to be launched in order to get the right settings.)
- Wait a few hours after you have assigned the initiative to allow Azure Resource Manager (ARM) to analyze existing workloads for compliance.
- Navigate in the Azure portal to Policy -> Compliance -> Definitions and click on the Configure Microsoft Sentinel for workload protections assignment.
-
Click on the Non-compliant resources tab to see if you need to launch any remediation tasks. If any non-compliant resources are listed, push the Create Remediation Task button as seen in Figure 9.
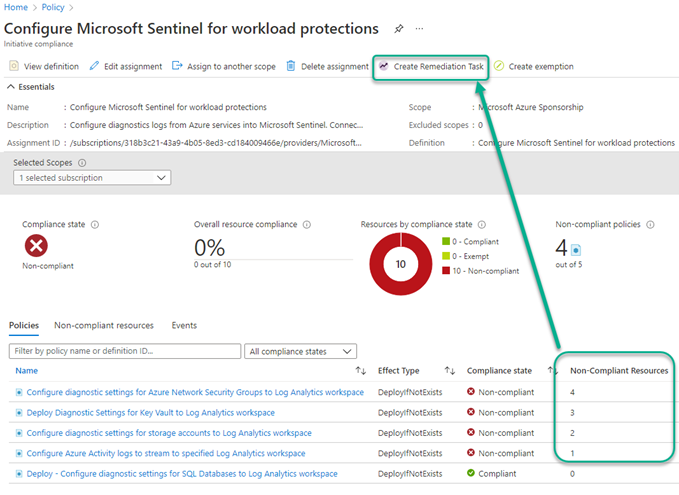
Figure 9 – Create Remediation Task for Non-Compliant Resources
-
For each of the five (5) policies:
- Select the policy in the Policy to remediate drop-down box.
- If there are resources needing that remediation, their names will appear at the lower part of the page. (If you have no resources of the type for that policy needing remediation, no resource names appear.)
- Push the Remediate button.
- Repeat these steps for each of the remaining policies–that is, select the next policy from the Policy to remediate drop-down box and see if there are non-compliant resources to remediate.
-
Check the status of all the remediation tasks you launched from the Policy -> Remediation -> Remediation tasks view, seen in Figure 10.
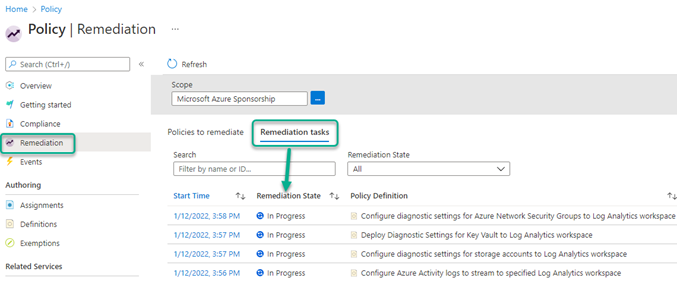
Figure 10 – Tracking the status of in-progress Remediation tasks.
-
You can spot-verify one or more workload protections by navigating to the Diagnostic settings an in-scope workload. For example, Figure 11 shows Microsoft Sentinel connected to a storage account.
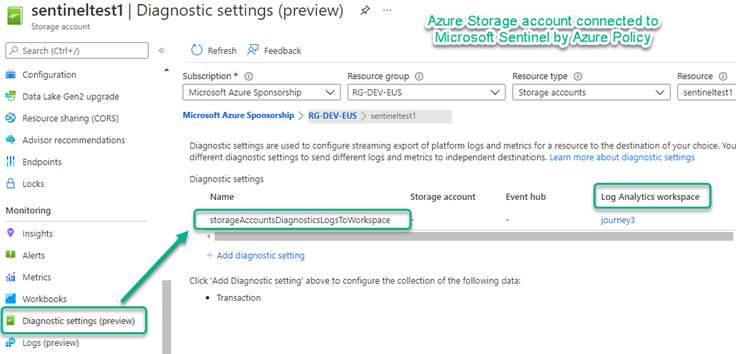
Figure 11 – Diagnostic settings enabled for Azure Storage (Key Vault and Network Security Groups are also connected this way).
SQL Server connection to Microsoft Sentinel presents itself on the Auditing settings of an in-scope SQL server workload as seen in Figure 12.
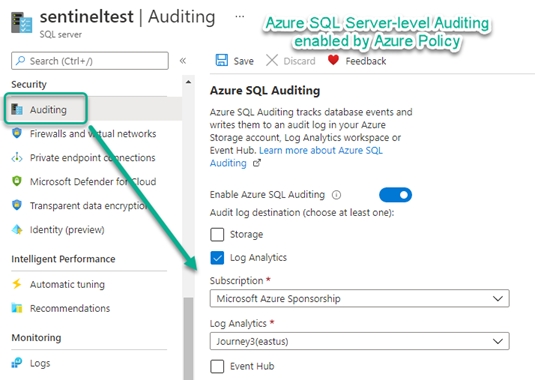
Figure 12 – Auditing settings for Azure SQL server enabled for Microsoft Sentinel workload connection.
-
Observe in the Microsoft Sentinel data connectors view (Figure 13) that you have achieved 100% compliance for the policy initiative. Congratulations on securing your Microsoft Sentinel workload connections using a consolidated Azure Policy!
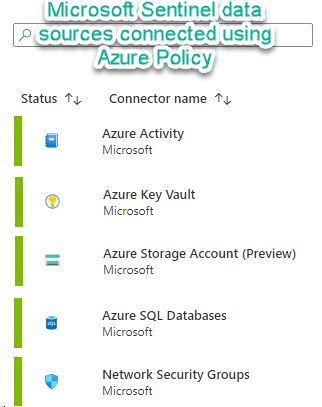
Figure 13 – Microsoft Sentinel data connectors enabled by Azure policy.
- If you have workloads in other subscriptions to connect to Microsoft Sentinel, consult this link for options to assign the initiative to other scopes at the subscription or the management group levels:
Code Reference
Although not needed to deploy the solution described in this article, I have posted reference copies of the two custom initiatives from this article in my Github repo:
Want to learn more about Azure Arc server?
This article is a complement to my new book co-authored with Azure MVP Steve Buchanan with forward by Microsoft’s Sr. Cloud Advocate Thomas Maurer: Azure Arc-Enabled Kubernetes and Servers: Extending Hyperscale Cloud Management to Your Datacenter.
https://www.amazon.com/gp/product/1484277678
“Azure experts and MVPs Buchanan and Joyner provide just the right amount of context so you can grasp important concepts, and get right to the business of using and gaining value from Azure Arc. If your organization has resources across hybrid cloud, multi-cloud, and edge environments, then this book is for you. You will learn how to configure and use Azure Arc to uniformly manage workloads across all of these environments.”
Tags: #AzurePolicy #MVPBuzz #MicrosoftSentinel #HybridCloud #Governance #AzureGovernance #Compliance #DefenderForCloud #AzureArc