
Many organizations are turning to Microsoft’s cloud-native Azure Sentinel as their primary enterprise SIEM because Azure Sentinel is the best solution for cloud and hybrid IT estates. Azure Sentinel excels at integrating cloud identity and cloud application logging into a holistic security picture that includes device and network logging. For most any Azure Sentinel enterprise with an on-prem footprint, there will be on-prem firewalls or in-cloud virtual network appliances and security services that need to be connected to Azure Sentinel. This article is a deep dive into all the tasks needed to deploy a best practice connectivity solution for your firewall devices.
Determine location and capacity of Log Forwarder Pool
The defining feature of the log ingestion solution for devices into Azure Sentinel is the Log Forwarder. A log forwarder is a Linux VM running the standard Azure Log Analytics agent. With some small modifications to the built-in Linux Syslog daemon (rsyslog.d or syslog-ng), a modest Linux VM becomes a virtual log forwarding appliance to Azure Sentinel, your SIEM in the cloud.
- An enterprise can have as many log forwarders as appropriate. They can be on-prem, in other clouds, and in Azure.
-
The capacity of a single log forwarder is about 2,000 syslog messages per second.
- Scale out and/or add N+1 redundancy by adding additional log forwarder nodes to a pool.
- Log forwarder pools work with DNS round robin as well as load balancers.
-
Syslog message size varies greatly on the source and type of syslog data, so a good approach is to be ready to adapt up or down in syslog forwarding capacity as you move into full production. Scale when and if needed as your actual daily message load is discovered.
TIP: If your daily log volume approaches or is greater than 100-GB per day, start with at least a two-node forwarder pool.
- Log forwarders can be divided across two or more Azure Sentinel workspaces for enterprises that require multiple workspaces due to regional requirements.
-
Route your syslog traffic over the public Internet or over private WAN connections that route to Azure via IPSEC tunnel or ExpressRoute.
- Avoid routing syslog traffic from one Azure region to another over Azure private networks, which would otherwise incur an egress charge from the source network(s).
- Leverage Azure Network Security Groups (NSGs) to restrict connection to Internet-based syslog forwarders to the outbound public IPs of your firewalls.
- Optionally use TLS to encrypt syslog messages in transit. When using TLS there is no need to manage a list of allowed IPs for the NSG.
As a best practice, a single Azure Sentinel workspace with a single highly-available, high-capacity log forwarder pool is appropriate for many enterprises and is the subject of this article. Figure 1 illustrates how an enterprise can route its global firewall log traffic over the Internet to an Azure-hosted log forwarder pool in the Azure region where the highest volume of log traffic originates.
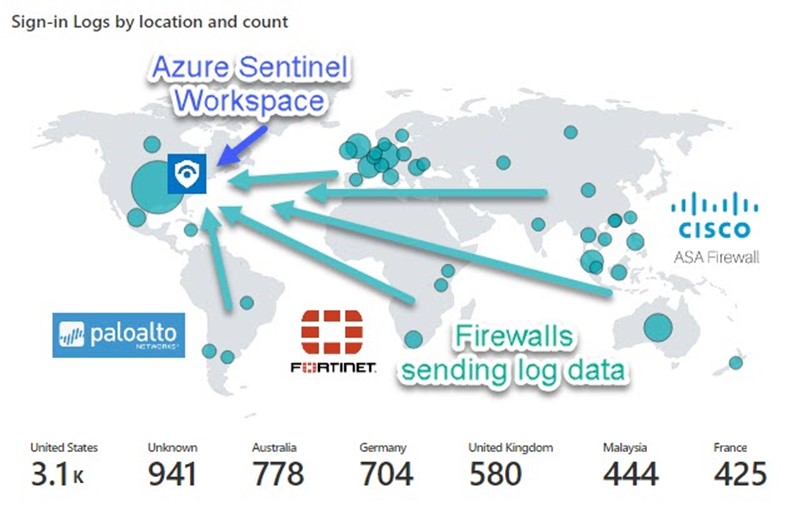
Figure 1 – Azure AD Sign-in by location and count in an Azure Workbook visualizes the global distribution of an enterprise’s firewalls.
Deploy the HA Log Forwarder Pool
Placing your syslog forwarder pool in Azure makes for light work in deployment, maintenance, and operation tasks. Benefits include rapid provisioning, minimal additional configuration, inline monitoring and updating for security compliance, low predictable cost, and the additional security of being hosted in the Azure cloud. (Such as DDoS Protection Basic service which is integrated into the Azure platform by default and at no additional cost.) Figure 2 is an annotated screenshot from the Azure portal (Load balancer Monitoring -> Insights) of a production enterprise log forwarder pool.
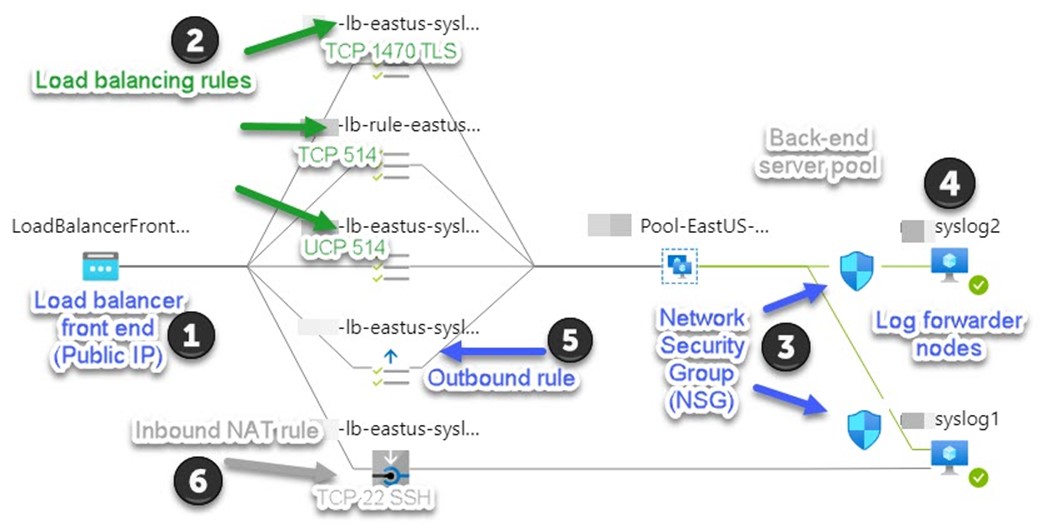
Figure 2 – Network Insights for Load Balancers in the Azure portal documents the live configuration of your log forwarder pool.
Here are the settings of the syslog forwarder pool and what they do in the solution:
1 – Load balancer front end (Public IP)
An Azure Load Balancer (Standard SKU) front end configuration consists of a Public IP (Standard SKU) which is used by all the inbound and outbound load balancer rules in the solution. The Public IP will include a DNS name, such as “mysyslogpool.eastus.cloudapp.azure.com“. Configure your syslog devices using the Internet with this DNS name as their syslog destination.
2 – Load balancing rules (inbound)
Configure your load balancer with one inbound rule per TCP or UDP port that is published to the syslog forwarders. A typical large enterprise might leverage three (3) syslog destination endpoints:
- TCP 1470 TLS. Default port for Cisco ASA devices sending SSL-based syslog messages, deploy with TLS encryption.
- TCP 514. Default TCP port for syslog devices, deploy without TLS encryption.
- UDP 514. Default UDP port for syslog devices, does not support TLS encryption.
Azure load balancers can have the same, or different front-end port to back-end port mapping. That is, you can use the same port for both sides of the load balancer, or map a different back end port to a given front end port.
3 – Network Security Group (NSG)
Using an NSG to restrict inbound connections from the Internet is a best practice for all Azure VMs with Internet exposure. While there is little need to restrict TLS-secured syslog listeners to specific IPs via NSG, you do want to only allow non-TLS syslog connections from authorized devices. Consider an NSG with the four (4) inbound rules seen in Figure 3, which are associated with the network interfaces of your log forwarder VMs:
|
Protocol |
Source |
|
SSH TCP 22 |
<Specific IPs of authorized syslog admins> |
|
Syslog TCP 1470 TLS |
Any |
|
Syslog TCP 514 |
<Specific IPs of authorized syslog devices sending TCP 514> |
|
Syslog UDP 514 |
<Specific IPs of authorized syslog devices sending UDP 514> |
Figure 3 – Chart of NSG inbound allow rules that supports multiple syslog endpoints.
Associate the NSG with the network interface of each log forwarder VM. The same NSG will apply equally to all log forwarders.
4 – Log forwarder nodes
Start with two (2) Linux VMs of modest capacity such as size “B2MS”, configured with Azure Log Analytics agents that report into your Azure Sentinel workspace. Upsize the VMs and add more VMs as necessary to tune the size of your log forwarder pool. Ubuntu 18.04 is a broadly supported Linux OS that includes Python 3 pre-installed. (Python is required to install the syslog CEF connector.)
Configuration of firewall syslog collection is made easy in the Azure Sentinel console: Each Data connector has an Open Connector page button that exposes a device-specific blade like the Cisco ASA page seen in Figure 4.
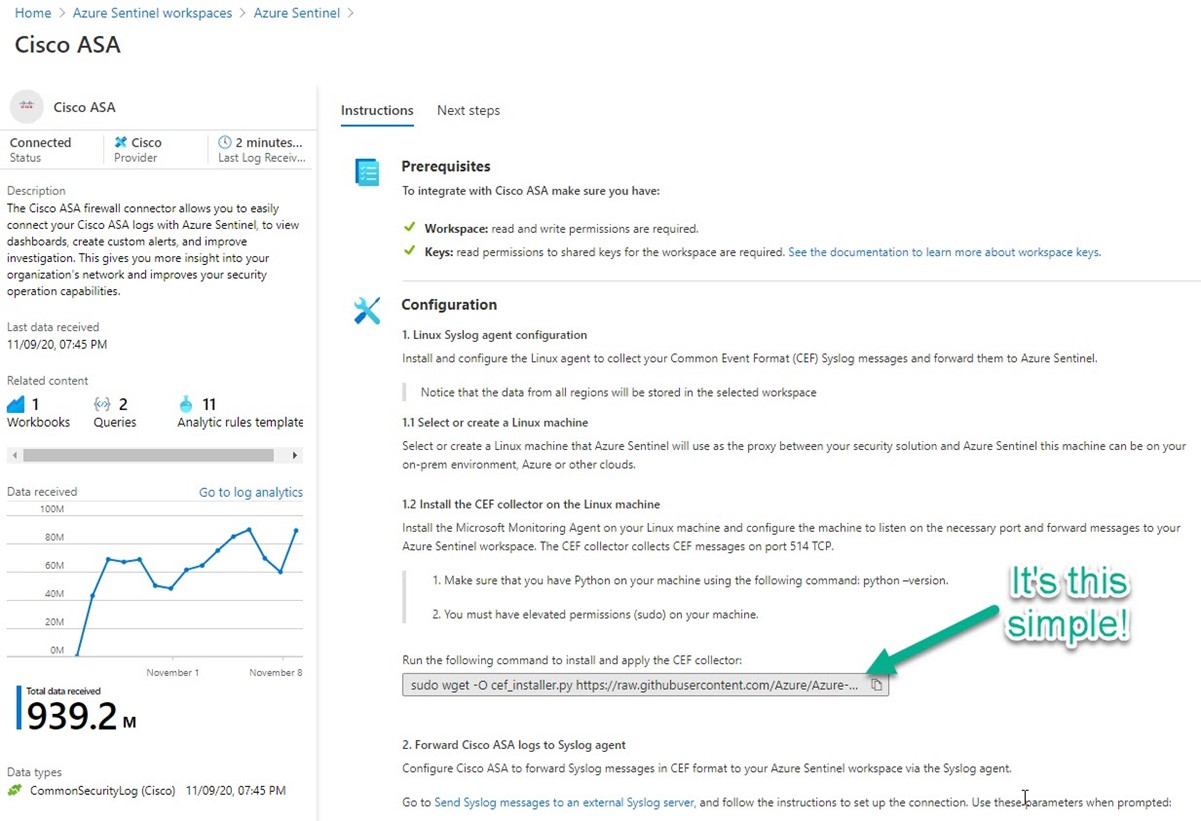
Figure 4 – It’s this simple to configure your Linux syslog forwarder– just copy and paste this one command line to your Linux VM in an SSH session.
On the configuration page for your device vendor, you will find custom, context-sensitive command lines ready to paste into your Linux VMs SSH session. Most device connectors utilize the “Common Event Format” (CEF), which is a specially formatted syslog message type, different from standard syslog but riding the same syslog delivery channels as non-CEF syslog. Through parsing, the syslog daemon will recognize CEF messages in the syslog stream and copy them out for processing as CEF traffic.
IMPORTANT: Increase the default size of the VM’s hard disk from 30-GB to 125-GB at the time the VM is created. Consider hard disk sizes up to 250-GB for > 1,000 message per second throughput environments (disk space is consumed by log files that are pruned after 7 days, high throughput forwarders create larger logs before pruning occurs).
5 – Load balancer Front End outbound rule
When you configure each load balancing (inbound) rule, there is an SNAT setting you should enable: “Use outbound rules to provide backend pool members access to the Internet”. SNAT enables IP masquerading of the backend instance. This masquerading prevents outside sources from having a direct address to the backend instances.
6 – Inbound NAT rule
An inbound NAT rule forwards incoming traffic sent to a selected IP address and port combination to a specific VM. You will need this feature to individually administer each log forwarder node. Linux VMs are administered using SSH on default port TCP 22. Don’t include SSH in the load balancer inbound rules because this would connect your SSH session randomly to any node in the back-end pool. Rather, using an inbound NAT rule, toggle the target VM to each node in turn for maintenance and administration.
Cost Estimate for two-node log forwarder pool
Starting cost for a two-node log forwarder pool in the East US region is about $160 per month as shown in Figure 5 Microsoft Azure Estimate (from the online calculator). Scale up by increasing the size of the VMs, scale out by increasing the quantity of log forwarder VMs in the pool.
|
Microsoft Azure Estimate |
|||
|
Your Estimate |
|||
|
Service type |
Region |
Description |
Estimated monthly cost |
|
Virtual Machines |
East US |
2 B2MS (2 vCPUs, 8 GB RAM) x 730 Hours; Linux – Ubuntu; Pay as you go; 1 managed OS disk – S10, 100 transaction units; 5 GB Bandwidth |
$133.34 |
|
IP Addresses |
East US |
1 Static IP Addresses, 0 Public IP Prefixes |
$3.65 |
|
Load Balancer |
East US |
Standard Tier: 5 Rules, 1,000 GB Data Processed |
$23.25 |
|
Total |
$160.24 |
||
Figure 5 – Cost estimate for a two-node log forwarder pool in Azure (does not reflect additional transaction units or networking bandwidth, or data processing charges > 1-TB / month)
Configure Log Forwarder Pool for SSL/TLS
Leveraging the Internet for direct access to the log forwarder pool by each firewall is efficient and avoids network charges of all types such as VPN tunnel/ExpressRoute utilization and cross-region Azure transfers. Security concerns are mitigated by encrypting the syslog metadata using well-known SSL techniques. Syslog TLS, whereby the TCP listener of a syslog forwarder is bound to an SSL certificate just like a web server accessed using an https:// URL, has been a rare implementation. However with the advent of low-cost cloud-based syslog forwarder pools, turning to SSL encryption for this role is prudent and achievable.
TIP: Using a syslog forwarder pool is very convenient when testing with new devices, you can pull out a node and dedicate it for testing using a temporary public IP, then return to the pool when testing is complete. When a node is dedicated for testing in this manner, running a “tail” on the syslog log file itself (sudo tail -f /var/log/syslog) exposes the raw communications between a device and the syslog forwarder. Normally, when a node is a member of the pool, this log is clobbered with thousands of messages and makes isolating a specific device’s traffic difficult.
SYSLOG TLS NOTES:
- Self-signed CA certificates generated by Ubuntu Linux OS work great.
- Provide “CA=yes” responses during certificate request. Leave CRL URL and UID fields blank.
- Name the cert (CN=) after the pubic DNS name of the syslog receiver. Set to 3650 days expiration (10 years).
- Leave the certs on the syslog forwarder(s), and share the ca.pem file with devices to be monitored.
- For multi-server syslog forwarder pools, copy /etc/pki/tls/private/*.* to each syslog pool member and just edit rsyslog.conf per the procedure below in the same manner as the original syslog server where the certificates were generated.
- The rslserver-key.pem file is the actual private key. No password is needed to use.
- This solution produces three syslog listeners: UDP 514, TCP 514, and TCP TLS 1470.
SYSLOG TLS PROCEDURE:
1 – Create and stage your certificates
You may need to install some rsyslog utilities first (install on all syslog forwarder VM nodes):
sudo apt-get install rsyslog-gnutls
sudo apt-get install gnutls-bin
sudo apt-get install auditd
Follow this procedure to generate your certificates, keeping in mind the “SYSLOG TLS NOTES” listed above:
Certificates look like Figure 6 on the syslog forwarder when ready to proceed:

Figure 6 – These three (3) certificates need to reside in /etc/pki/tls/private on each log forwarder node.
Additionally, you will distribute the ca.pem file to the devices that will be syslog TLS clients. By trusting this certificate, and accessing the syslog forwarder pool by the DNS name of the public IP bound to the load balancer front end, syslog metadata from firewall devices is encrypted.
2 – Edit the syslog listener configuration
Make a backup copy of the file /etc/rsyslog.conf and replace it with this content:
——————————————————————————————————————————–
# /etc/rsyslog.conf Configuration file for rsyslog.
#
# For more information see
# /usr/share/doc/rsyslog-doc/html/rsyslog_conf.html
#
# Default logging rules can be found in /etc/rsyslog.d/50-default.conf
#################
#### MODULES ####
#################
module(load=”imuxsock”) # provides support for local system logging
#module(load=”immark”) # provides –MARK– message capability
# provides UDP syslog reception
module(load=”imudp”)
input(type=”imudp” port=”514″)
# provides TCP syslog reception
# Comment because using imptcp
#module(load=”imtcp”)
#input(type=”imtcp” port=”514″)
# provides kernel logging support and enable non-kernel klog messages
module(load=”imklog” permitnonkernelfacility=”on”)
###########################
#### GLOBAL DIRECTIVES ####
###########################
#
# Use traditional timestamp format.
# To enable high precision timestamps, comment out the following line.
#
$ActionFileDefaultTemplate RSYSLOG_TraditionalFileFormat
# config maximize TCP connections
# Uncomment if using imtcp
# $InputTCPMaxSessions 3000
# Filter duplicated messages
$RepeatedMsgReduction on
#
# Set the default permissions for all log files.
#
$FileOwner syslog
$FileGroup adm
$FileCreateMode 0640
$DirCreateMode 0755
$Umask 0022
$PrivDropToUser syslog
$PrivDropToGroup syslog
#
# Where to place spool and state files
#
$WorkDirectory /var/spool/rsyslog
#
# Include all config files in /etc/rsyslog.d/
#
$IncludeConfig /etc/rsyslog.d/*.conf
global(
defaultNetstreamDriverCAFile=”/etc/pki/tls/private/ca.pem”
defaultNetstreamDriverCertFile=”/etc/pki/tls/private/rslserver-cert.pem”
defaultNetstreamDriverKeyFile=”/etc/pki/tls/private/rslserver-key.pem”
)
# Load the imptcp module to provide the ability to receive messages over plain TCP
module(load=”imptcp”)
# Load the imtcp module to provide the ability to receive messages over TLS
# Note: MaxSessions=”3000″ added after load=”imtcp” for high capacity
module(
load=”imtcp” MaxSessions=”3000″
streamdriver.name=”gtls” # use gtls netstream driver
streamdriver.mode=”1″ # require TLS for the connection
streamdriver.authmode=”anon” # server is NOT authenticated
)
# Listen op port 514 (imptcp driver)
input(
type=”imptcp”
port=”514″
)
# Listen on port 1470 (imtcp driver)
input(
type=”imtcp”
port=”1470″
)
——————————————————————————————————————————–
TIP: About the streamdriver.authmode setting: Some TLS implementations may default to $InputTCPServerStreamDriverAuthMode = “x509/name“. However you want to use the $InputTCPServerStreamDriverAuthMode = “anon” as shown in the above sample configuration. This allows any firewall device that trusts the CA to connect without authorizing the incoming client connection, that is, without requiring the client to present a personal identity certificate.
Restart rsyslog daemon:
$ sudo systemctl restart rsyslog
3 – Verify the syslog listener configuration
Run this command and observe the syslog daemon is listening on the TCP ports you expect as seen in Figure 7:
$ sudo lsof -i -P -n | grep LISTEN
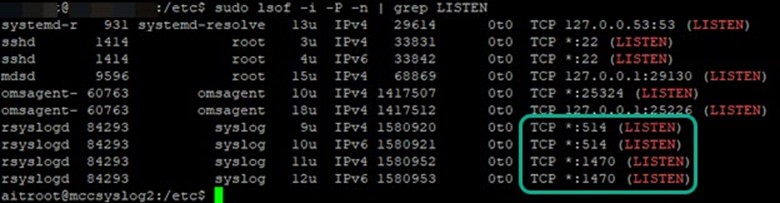
Figure 7 – Verify syslog daemon is listening on the TCP ports you expect.
4 – Send a test syslog TLS message
While it’s not difficult to test that a non-TLS encrypted syslog message can be received using utilities like Solarwinds Kiwi Syslog Message Generator, something more is required to test that your syslog forwarder can receive encrypted syslog messages. Here is a procedure you can follow to send a test syslog TLS message:
Here is a sample command line you might use to perform a syslog TLS test:
$ echo "<142>$HOSTNAME Hello World, $RANDOM" | gnutls-cli mysyslogpool.eastus.cloudapp.azure.com --port=1470 --x509cafile=/home/<username>/ca.pem
TIP: Run the syslog TLS test from a node that’s been pulled from the syslog pool against the online pool, this tests the first pool member. Then reverse the pool membership and test the second pool member.
When sending the test syslog, monitor the syslog forwarder (destination) with:
$ sudo tail -f /var/log/syslog
You should see the Hello World message send by the testing computer.
5 – Configure syslog to use TCP internally
An additional housekeeping step you need to perform on your syslog forwarder is to configure the internal syslog-to-Azure Log Analytics process to use TCP rather than UDP. Figure 8 shows the steps to do this:
1 – Select the syslog facilities and severities to collect in the Azure Log Analytics workspace -> Advanced settings -> Data -> Syslog and push Save. (Wait 15 minutes for this change to sync to the log forwarder VM.)
2 – Disable further automatic collection setting by running the python script in an SSH session to the log forwarder VM.
3 – Edit the syslog.conf and 95-omsagent.conf files as shown.
4 – Restart the rsyslog and Log Analytics agent services.
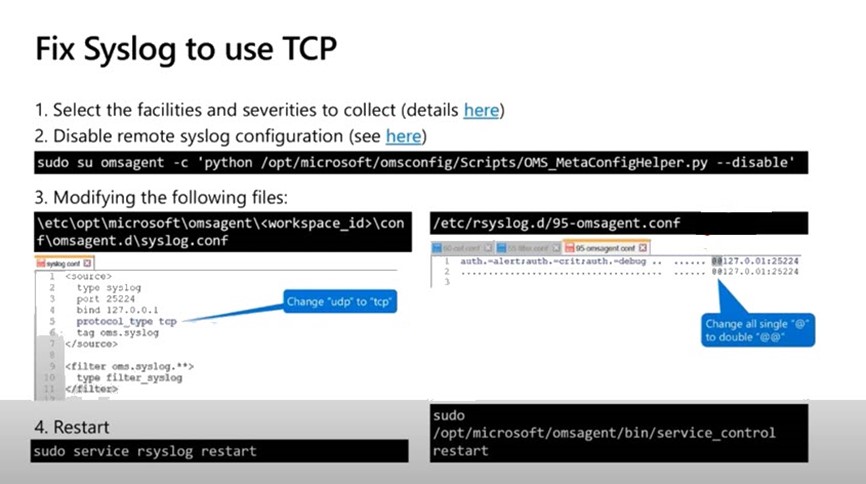
Figure 8 – Follow these steps to fix syslog to use TCP (source: Microsoft)
Configure firewalls for SSL/TLS
How you configure your specific device to use TLS with syslog varies by device vendor. Generally, it’s sufficient to upload the trusted CA file (ca.pem) into the firewall OS, select to use TLS, and enter the FQDN of the syslog forwarder pool (for example mysyslogpool.eastus.cloudapp.azure.com) rather than an IP address. Here are some vendor links on their procedures:
- Cisco ASA: https://www.cisco.com/c/en/us/td/docs/security/asa/asa913/asdm713/general/asdm-713-general-config/monitor-syslog.html#ID-2121-00000615
- Cisco Firepower: https://www.cisco.com/c/en/us/td/docs/security/firepower/623/configuration/guide/fpmc-config-guide-v623/platform_settings_for_firepower_threat_defense.html
- Palo Alto: https://docs.paloaltonetworks.com/pan-os/8-1/pan-os-admin/monitoring/use-syslog-for-monitoring/configure-syslog-monitoring.html
- Fortinet: https://docs.fortinet.com/document/fortigate/6.0.0/cli-reference/260508/log-syslogd-syslogd2-syslogd3-syslogd4-setting
- Barracuda:
https://campus.barracuda.com/product/cloudgenfirewall/doc/73719612/how-to-configure-syslog-streaming - Check Point:
https://sc1.checkpoint.com/documents/R80.30/WebAdminGuides/EN/CP_R80.30_LoggingAndMonitoring_AdminGuide/html_frameset.htm
If you come across a device that doesn’t support syslog TLS, in this solution, configure the device to use syslog TCP 514 or UDP 514 and add the device’s public IP address to the NSG’s allowed inbound rule.
KQL query to map device names
Once your firewall logs are arriving in Azure Sentinel, you will see you have DeviceName
names for CEF devices and HostName names for syslog devices. Neither of these may match your internal names of the firewall devices, that is, the firewall names that are familiar to your operations teams. Often these names match a reverse DNS name lookup for the IP, which resolves to an ISP or other carrier. This can make it difficult or inconvenient to identify specific firewall devices in log and workbook views. As a simple workaround, when applicable, there is a way to use the query command extend with the iif operand to add custom labels to data returned in queries.
Adapt the example query below (specific to CEF messages from Cisco ASA devices) to your environment. The sample has four (4) ASA devices, the output of this query will name the devices: HQ-ASA, Region-1-ASA, Region-2-ASA, and Branch-1-ASA. Figure 9 shows how this query displays in the log viewer.
CommonSecurityLog
| where DeviceVendor == "Cisco"
| where DeviceProduct == "ASA"
| distinct DeviceName
| extend ASADeviceName = iif(DeviceName == "226-215-74-40.comcast.net", "HQ-ASA", iif(DeviceName == "wsip-83-16-65-12.cox.net", "Region-1-ASA", iif(DeviceName == "079-215-44-118.biz.com", "Region-2-ASA ", iif(DeviceName == "wsip-80-75-187-249.cox.net", "Branch-1-ASA","Other"))))
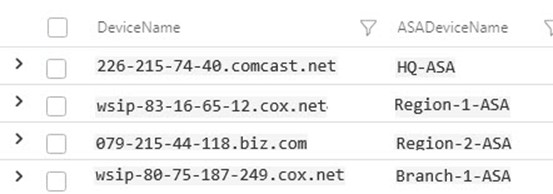
Figure 9 – Custom device names mapped to less-intuitive DNS names makes for easier administration.
Extend the list Query by adding a new item like this iif(DeviceName == “wsip-80-75-187-249.cox.net”, “Branch-1-ASA”,after the last item and before the entry “Other”, also adding another “)” at the end of the query line.
TIP: Save your custom name-mapping query to the Log Viewer, Query explorer for future use and re-use inside workbooks and other queries. How to do it: Push the Save button in the log viewer, create a new Category for your devices if you like.
Filter CEF messages
By default, incoming syslog messages that are also in CEF format (like they will be for most firewall vendors) are ingested essentially twice, that is, nearly duplicate entries are made in the Log Analytics Syslog table and in the CommonSecurityLog table.
- Only the CEF copies are of interest for security analytics, because they are densely pre-parsed for relevant security data that many Azure Sentinel alert rules and workbooks are keyed for.
- Syslog messages remain in ‘raw’ (unparsed) format from a security analysis perspective until and if custom parsing is achieved through custom fields.
For the large enterprise concerned about economizing Azure Sentinel data ingestion charges, this article will now describe a method to filter CEF messages from syslog ingestion.
- This method was described 9/2/2020 in the Azure Sentinel webinar: Log Forwarder deep dive | Filtering CEF and Syslog events.
-
CEF message filtering is achieved by exploiting the behavior of rsyslog.conf to load supplemental config files in the /etc/rsyslog.d folder in alphanumeric order.
- The default file /etc/rsyslog.d/95-omsagent.conf performs the transfer of syslog messages to Azure Log Analytics.
- Placing .conf files in the /etc/rsyslog.d folder named alphanumerically lower than ’95-omsagent.conf’ will cause them to be executed before the default file.
- A ‘stop’ command in a .conf file ends processing and prevents alphanumerically higher .conf files from executing, such as the default file.
-
Create a new file /etc/rsyslog.d/60-cef.conf with the following content (in this example for Cisco ASA devices):
if ($rawmsg contains "CEF:") or ($rawmsg contains "%ASA-") then @@127.0.0.1:25226& stop
-
For syslog devices that are not Cisco ASA, replace “%ASA-” with a character string that uniquely identifies your device vendor.
-
This .conf file sends syslog messages to the internal CEF redirector on TCP port 25226 when they are from a Cisco ASA device, then stops execution, preventing a duplicate syslog message from existing in Azure Log Analytics.
-
This .conf file is skipped when there is not an ASA device type match, allowing the syslog message to be processed by the default 95-omsagent.conf.
- Optionally create another new file /etc/rsyslog.d/55-cef.conf to perform additional custom filtering appropriate for your environment. This file will filter out unwanted syslog traffic before any other filters or connectors. Figure 10 lists examples of how you can filter out specific text and message types from further processing, each of these examples would be the contents of an optional 55-cef.conf file. This is a really powerful feature for the large enterprise to finely shape and tune their log ingestion to meet operational and budgetary targets.

Figure 10 – Example custom filters (in an optional 55-cef.conf file) show how you have unlimited control over CEF and syslog ingestion. (source: Microsoft)
Configure Analytics Alert Rules and Workbooks for your Firewalls
If you have completed the steps outlined in this article, you will be processing very valuable security data from your firewalls into your SIEM. Let’s finish with a discussion of how to get the most out of your firewall connection to Azure Sentinel.
Again, the Azure Sentinel portal design makes this relatively simple. As we saw previously on the Open Connector page in Figure 4, there is a Next Steps button for each firewall vendor that points you to workbooks, queries, and rule templates relevant for that vendor (see Figure 11):
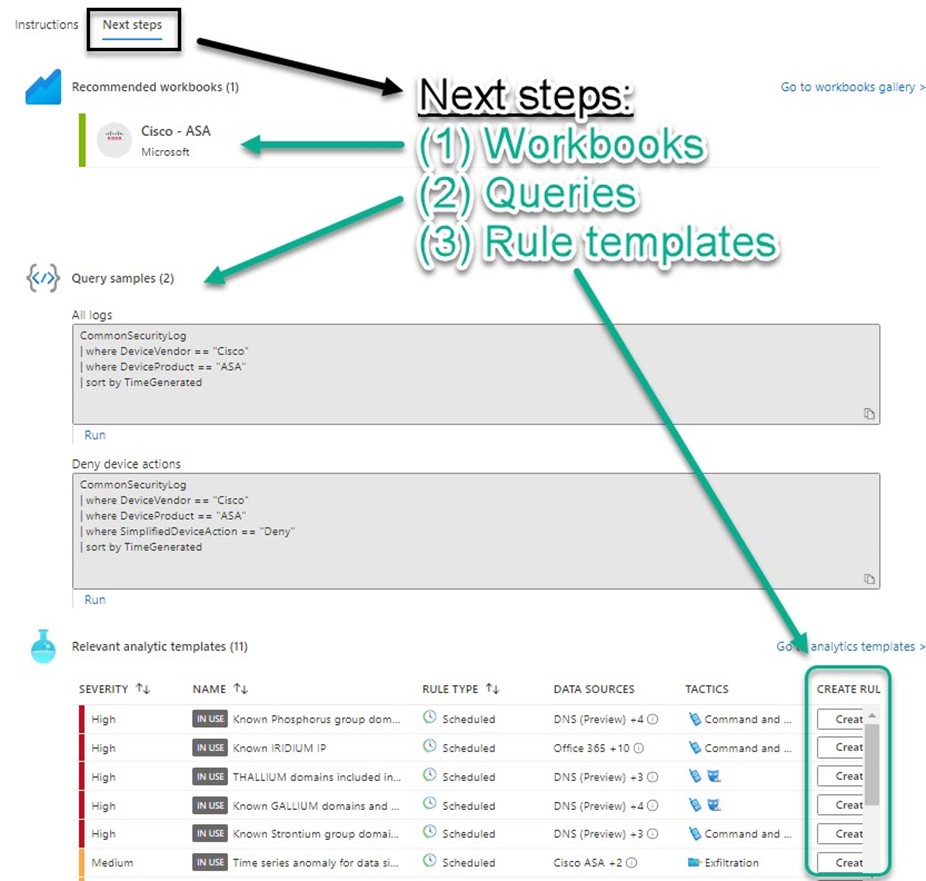
Figure 11 – After connecting a firewall vendor product, consult the Next Steps blade to get the most out of your security data.
Click through to recommended workbook(s) and familiarize yourself with the default charts and views. If you find a workbook useful, push the Save button from the workbook’s Template view. This will enable you to edit and save changes to the default workbook, making it more useful in your environment. For example, Figure 12 shows the KQL query to map device names introduced previously in this article embedded in the Cisco ASA workbook as “Cisco ASA Device List“:
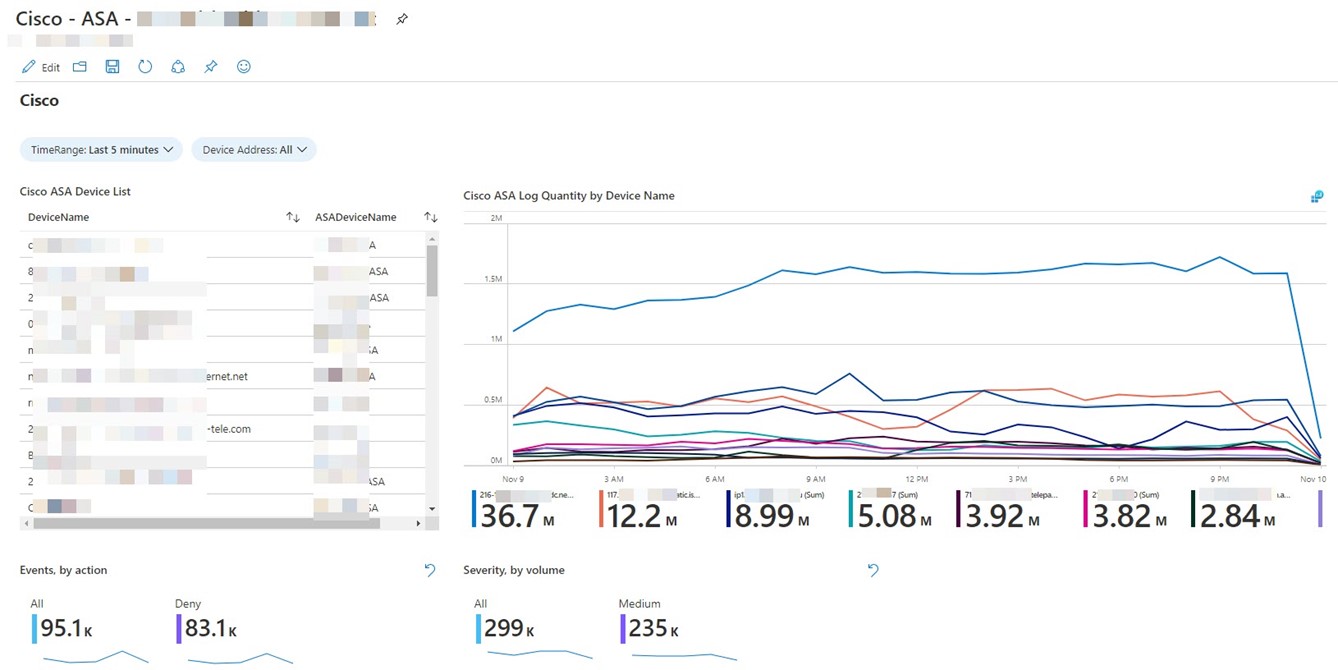
Figure 12 – A customized version of the Cisco – ASA workbook that includes a user-friendly device name map.
Take advantage of the Create buttons that appear next to each relevant analytic template (lower right, Figure 11). It doesn’t take too long to enable each template as an Active rule that will then alert team members to incidents. This simple process takes the guesswork out of choosing which analytic templates to enable as active rules for your applicable firewall vendor(s).
Figure 13 sums up Why we do it: The Investigation pane of an incident sourced from a firewall active rule: Cisco – firewall block but success logon to Azure AD. This incident spans the hybrid estate, linking an on-prem firewall event with in-cloud login events and is the sort of security product you can expect from a best-practice deployment of Azure Sentinel. Azure Sentinel’s powerful investigation features let you seek out and discover related events and entities across all your security domains.
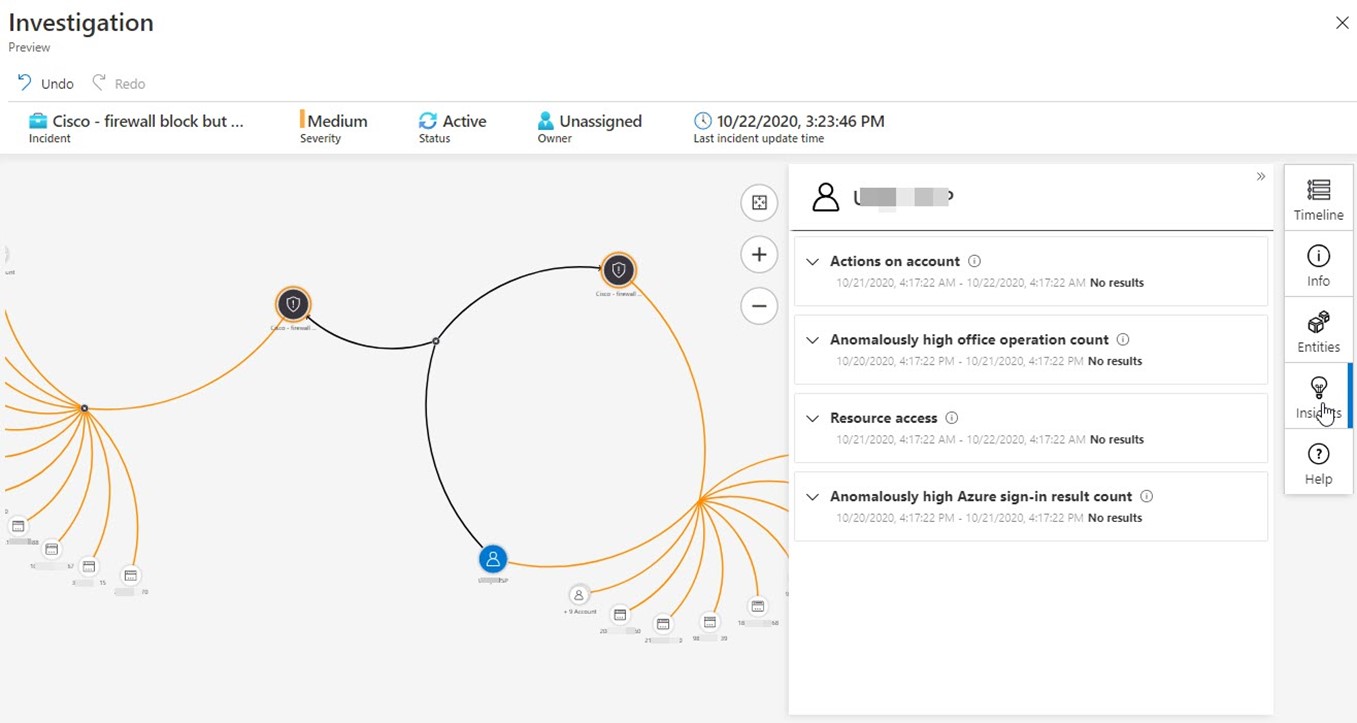
Figure 13 – The Azure Sentinel Investigation pane helping prosecute a firewall incident that spans the on-prem and in-cloud environments.
Tags: #MVPBuzz #AzureSentinel #securityManagement #SIEM #ASA #firewall #PaloAlto #Cisco #Fortinet #syslog
6 thoughts on “Azure Sentinel: Connecting the Enterprise Firewalls”
For hottest information you have to pay a visit the web and on web I found this site as
a most excellent web site for most up-to-date
updates.
This is great! Probably the first (and only) document in the Web that describe how to setup TLS with the Azure Sentinel CEF Forwarders. Quite helpful.
Hi how about Fortigate devices? is tls supported for CEF format?
For sure! FortiGate devices can report in either ‘syslog’ or ‘CEF’ format. You select which format on the FortiGate device
Use the following command to configure syslog to use CEF format:
CLI:
#config log syslog setting
#set format cef
#end
Hi what if the lb is behind azure firewall that has publick ip configured and with vnet + nsg config?
Hi James, I don’t see a reason that [ Azure Firewall with public IP ] -> [ VNET + NSG ] -> [ LB with private IP ] -> [Syslog forwarder pool ] wouldn’t work. Of course you might need some additional firewall and routing rules. Have you tried it?